
Installation guide


Chapter 3
22 Sniffer Portable
To install adapters and Sniffer enhanced drivers on Windows NT:
1 Ensure Sniffer Portable software is installed. If it is not installed, install
it now.
2 If you have a previously installed driver (a previous version of a Sniffer
driver or another vendor’s driver), you must first uninstall the driver
before installing the Sniffer enhanced driver. Remove drivers in
Windows NT through the Adapters tab of the Network control panel.
3 Shut down the computer.
4 Following the manufacturer’s instructions, insert the supported adapter
into an available slot in your computer.
5 Start the computer and log in to Windows NT as an Administrator.
6 Go to Start > Settings > Control Panel, and double-click Network.
7 Click the Adapters tab.
8 Click Add.
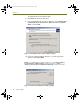
9 In the Select Network Adapter dialog box, click Have Disk.
10 In the Insert Disk dialog box, enter the directory path where the Sniffer
enhanced driver is located. See
Table 3-3 for Sniffer enhanced driver
locations.
For example, enter C:\Program Files\Nai\SnifferNT\Driver\en\
Xircom\WinNT for a Xircom Sniffer enhanced driver.
11 Click OK.
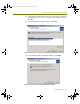
12 Select the appropriate adapter in the Select OEM Option dialog box
and click OK.
13 A Configuration dialog box with the adapter name in the title bar
appears. Do not change the default setup specific to your installed
adapter. Click OK.
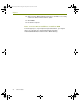
14 Click the Bindings tab to initialize the adapter.
15 Click the Protocols tab, select TCP/IP Protocol, then click Properties.
The Microsoft TCP/IP Properties dialog box opens.
16 In the Microsoft TCP/IP Properties dialog box, ensure the correct
adapter name is highlighted in the Adapter field.
17 Select one of the following IP address settings for the adapter:
100413Portable_Install.book Page 22 Friday, March 25, 2005 2:22 PM