
Installation guide


Chapter 3
20 Sniffer Portable
To install a Sniffer supported adapter and driver in Windows XP:
1 Make sure the Sniffer Portable software is installed. If it is not installed,
install it now.
2 Log in to Windows XP as an Administrator.
3 Insert the adapter in an available card slot on the target machine.
Windows XP automatically detects the new card and installs its native
device driver.
4 Open the Network Connections folder by selecting Start > Settings >
Control Panel > Network Connections > Local Area Network.
5 Right-click the Network Connection entry associated with the adapter
you just inserted and select Properties from the menu.
6 Click Configure to open the Network Connections Properties dialog
box.
7 Click the Driver tab.
8 Click Update Driver.
The Hardware Update Wizard starts.
9 Select the Install from a list or specific location (Advanced) option.
and click Next.
10 Select the Don’t search option and click Next.
11 Click Have Disk.
The Install from Disk dialog box appears prompting you to supply the
path to the driver to install.
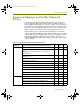
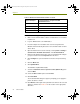
12 Click Browse and navigate to the path where the driver for the selected
adapter is installed. See
Table 3-2 for the location of the appropriate
driver files.
Table 3-2. Windows XP Sniffer Enhanced Driver Locations
Supported Adapter <local install drive>: \Program Files\NAI
\SnifferNT\Driver\en\...
Sniffer (Intel Pro 100) Intel\WinXP
Sniffer (Xircom) Xircom\WinXP
Sniffer (IBM Etherjet) IBM\WinXP
Adaptec 62011 Adaptec.620XX\WinXP
100413Portable_Install.book Page 20 Friday, March 25, 2005 2:22 PM