
Access Point User Guide
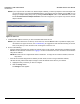
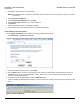
Table Of Contents
- Introduction
- Installation and Initialization
- System Status
- Advanced Configuration
- System
- Network
- Interfaces
- Management
- Filtering
- Alarms
- Bridge
- QoS
- Radius Profiles
- SSID/VLAN/Security
- Monitoring
- Commands
- Troubleshooting
- Command Line Interface (CLI)
- General Notes
- Command Line Interface (CLI) Variations
- CLI Command Types
- Using Tables and Strings
- Configuring the AP using CLI commands
- Set Basic Configuration Parameters using CLI Commands
- Set System Name, Location and Contact Information
- Set Static IP Address for the AP
- Change Passwords
- Set Network Names for the Wireless Interface
- Enable 802.11d Support and Set the Country Code
- Enable and Configure TX Power Control for the Wireless Interface(s)
- Configure SSIDs (Network Names), VLANs, and Profiles
- Download an AP Configuration File from your TFTP Server
- Backup your AP Configuration File
- Set up Auto Configuration
- Other Network Settings
- Configure the AP as a DHCP Server
- Configure the DNS Client
- Configure DHCP Relay
- Configure DHCP Relay Servers
- Maintain Client Connections using Link Integrity
- Change your Wireless Interface Settings
- Set Ethernet Speed and Transmission Mode
- Set Interface Management Services
- Configure Syslog
- Configure Intra BSS
- Configure Wireless Distribution System
- Configure MAC Access Control
- Set RADIUS Parameters
- Set Rogue Scan Parameters
- Set Hardware Configuration Reset Parameters
- Set VLAN/SSID Parameters
- Set Security Profile Parameters
- CLI Monitoring Parameters
- Parameter Tables
- CLI Batch File
- ASCII Character Chart
- Specifications
- Technical Support
- Statement of Warranty
- Regulatory Compliance

Installation and Initialization AP-4000 Series User Guide
Initialization
39
5. Click OK to continue with the operation or Cancel to abort the operation.
6. If the operation is unsuccessful, you will receive an error message. If this occurs, see the Troubleshooting chapter or
attempt installing the software with a TFTP server, as described in the next section.
7. If the operation is successful, you will receive a confirmation message. For installation changes to take effect, reboot
the AP as follows:
• Click Commands > Reboot.
• Enter 0 in the Time to Reboot field.
• Click OK.
Install Software with TFTP Server
A Trivial File Transfer Protocol (TFTP) server allows you to transfer files across a network. You can upload files from the
AP for backup or copying, and you can download the files for configuration and AP Image upgrades. The Solarwinds
TFTP server software is located on the ORiNOCO AP Installation CD-ROM. You can also download the latest TFTP
software from Solarwind’s Web site at http://www.solarwinds.net.
NOTE: If a TFTP server is not available in the network, you can perform similar file transfer operations using the HTTP
interface.See Update AP via HTTP.
After the TFTP server is installed:
• Check to see that TFTP is configured to point to the directory containing the AP Image.
• Make sure you have the proper TFTP server IP address, the proper AP Image file name, and that the TFTP server is
operational.
• Make sure the TFTP server is configured to both Transmit and Receive files, with no automatic shutdown or time-out.
The following types of files can be downloaded to the AP from a TFTP server:
• Config (configuration file)
• Image (AP software image or kernel)
• UpgradeBspBl (BSP/Bootloader firmware file)
• License file
• SSL Certificate
• SSL Private Key
• SSH Public Key
• SSH Private Key
• CLI Batch File
Install Updates from your TFTP Server using the Web Interface
1. Download the latest software from http://support.proxim.com (Knowledgebase Answer ID 1250). See Download the
Software for instructions).
2. Copy the latest software updates to your TFTP server.
3. In the Web Interface, click the Commands button and select the Download tab.
4. Enter the IP address of your TFTP server in the field provided.
5. Enter the File Name (including the file extension). Enter the full directory path and file name. If the file is located in the
default TFTP directory, you need enter only the file name.
6. Select the File Type from the drop-down menu (use Img for software updates).
7. Select Download & Reboot from the File Operation drop-down menu.
8. Click OK. The Access Point will reboot automatically when the download is complete.