
Access Point User Guide
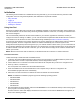
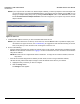
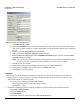
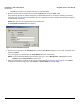
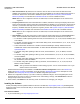
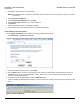
Table Of Contents
- Introduction
- Installation and Initialization
- System Status
- Advanced Configuration
- System
- Network
- Interfaces
- Management
- Filtering
- Alarms
- Bridge
- QoS
- Radius Profiles
- SSID/VLAN/Security
- Monitoring
- Commands
- Troubleshooting
- Command Line Interface (CLI)
- General Notes
- Command Line Interface (CLI) Variations
- CLI Command Types
- Using Tables and Strings
- Configuring the AP using CLI commands
- Set Basic Configuration Parameters using CLI Commands
- Set System Name, Location and Contact Information
- Set Static IP Address for the AP
- Change Passwords
- Set Network Names for the Wireless Interface
- Enable 802.11d Support and Set the Country Code
- Enable and Configure TX Power Control for the Wireless Interface(s)
- Configure SSIDs (Network Names), VLANs, and Profiles
- Download an AP Configuration File from your TFTP Server
- Backup your AP Configuration File
- Set up Auto Configuration
- Other Network Settings
- Configure the AP as a DHCP Server
- Configure the DNS Client
- Configure DHCP Relay
- Configure DHCP Relay Servers
- Maintain Client Connections using Link Integrity
- Change your Wireless Interface Settings
- Set Ethernet Speed and Transmission Mode
- Set Interface Management Services
- Configure Syslog
- Configure Intra BSS
- Configure Wireless Distribution System
- Configure MAC Access Control
- Set RADIUS Parameters
- Set Rogue Scan Parameters
- Set Hardware Configuration Reset Parameters
- Set VLAN/SSID Parameters
- Set Security Profile Parameters
- CLI Monitoring Parameters
- Parameter Tables
- CLI Batch File
- ASCII Character Chart
- Specifications
- Technical Support
- Statement of Warranty
- Regulatory Compliance

Installation and Initialization AP-4000 Series User Guide
Initialization
37
— Auto Channel Select: By default, the AP scans the area for other Access Points and selects the best
available communication channel, either a free channel (if available) or the channel with the least amount of
interference. Remove the check mark to disable this option. See Dynamic Frequency Selection/Radar
Detection (DFS/RD) for information and Available Channels for a list of available channels.
NOTE: When an AP is configured to function as a Mesh AP, its channel will depend on the channel of its
neighbors.
— Frequency Channel: When Auto Channel Select is enabled, this field is read-only and displays the Access
Point’s current operating channel. When Auto Channel Select is disabled, you can specify the Access Point’s
channel. If you decide to manually set the unit’s channel, ensure that nearby devices do not use the same
frequency. Available Channels vary based on regulatory domain. See Dynamic Frequency Selection/Radar
Detection (DFS/RD) for details more information and Available Channels for a list of available channels.
NOTE: When an AP is configured to function as a Mesh AP, its channel will depend on the channel of its
neighbors.
— Transmit Rate: Use the drop-down menu to select a specific transmit rate for the AP-4000/4000M/4900M’s
radios. The Auto Fallback feature allows the AP to select the best transmit rate based on the cell size.
— For the 802.11a radio operating in 802.11a mode, choose between 6, 9, 12, 18, 24, 36, 48, 54 Mbits/s, and
Auto Fallback.
— For the 802.11a radio operating in 4.9 GHz Public Safety mode, choose between 6, 9, 12, 18, 24, 36, 48,
54 Mbits/s, and Auto Fallback.
— These transmit rates are based on a 20 MHz channel bandwidth (the default). Additional rates are
available with 10 MHz channel bandwidths. To select alternate bandwidths and transmit rates, see
Operational Mode.
— For the 802.11b/g radio operating in 802.11b mode, choose between 1, 2, 5.5, 11 Mbits/s, and Auto
Fallback.
— For the 802.11b/g radio operating in 802.11g mode, choose between 6, 9, 12, 18, 24, 36, 48, 54 Mbits/s,
and Auto Fallback.
— For the 802.11b/g radio operating in 802.11b/g mode, choose between 1, 2, 5.5, 6, 9, 11, 12, 18, 24, 36,
48, 54 Mbits/sec, and Auto Fallback.
— For the 802.11b/g radio operating in 802.11g-wifi mode, choose between 6, 9, 12, 18, 24, 36, 48, 54
Mbits/s, and Auto Fallback.
NOTE: 802.11g-wifi has been defined for Wi-Fi testing purposes. It is not recommended for use in your
wireless network environment.
Additional advanced settings are available in the Wireless Interface Configuration screen. See Interfaces for
details. See Security Profile for a description of security features, Management VLAN for a description of VLAN
capabilities, and Configuring Security Profiles for detailed configuration procedures.
6. Review the configuration summary. If you want to make any additional changes, use the navigation panel on the
left-hand side of the screen to return to an earlier screen. After making a change, click Save & Next to save the
change and proceed to the next screen.
7. When finished, click Reboot on the Summary screen to restart the AP and apply your changes.
Installing the Software
Proxim periodically releases updated software for the AP on its Web site, http://support.proxim.com (Knowledgebase
Answer ID 1250). Proxim recommends that you check the Web site for the latest updates after you have installed and
initialized the unit.
Download the Software
1. In your web browser, go to http://support.proxim.com.