
Access Point User Guide
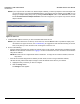
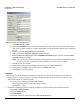
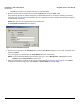
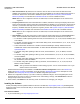
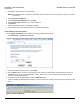
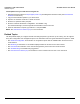
Table Of Contents
- Introduction
- Installation and Initialization
- System Status
- Advanced Configuration
- System
- Network
- Interfaces
- Management
- Filtering
- Alarms
- Bridge
- QoS
- Radius Profiles
- SSID/VLAN/Security
- Monitoring
- Commands
- Troubleshooting
- Command Line Interface (CLI)
- General Notes
- Command Line Interface (CLI) Variations
- CLI Command Types
- Using Tables and Strings
- Configuring the AP using CLI commands
- Set Basic Configuration Parameters using CLI Commands
- Set System Name, Location and Contact Information
- Set Static IP Address for the AP
- Change Passwords
- Set Network Names for the Wireless Interface
- Enable 802.11d Support and Set the Country Code
- Enable and Configure TX Power Control for the Wireless Interface(s)
- Configure SSIDs (Network Names), VLANs, and Profiles
- Download an AP Configuration File from your TFTP Server
- Backup your AP Configuration File
- Set up Auto Configuration
- Other Network Settings
- Configure the AP as a DHCP Server
- Configure the DNS Client
- Configure DHCP Relay
- Configure DHCP Relay Servers
- Maintain Client Connections using Link Integrity
- Change your Wireless Interface Settings
- Set Ethernet Speed and Transmission Mode
- Set Interface Management Services
- Configure Syslog
- Configure Intra BSS
- Configure Wireless Distribution System
- Configure MAC Access Control
- Set RADIUS Parameters
- Set Rogue Scan Parameters
- Set Hardware Configuration Reset Parameters
- Set VLAN/SSID Parameters
- Set Security Profile Parameters
- CLI Monitoring Parameters
- Parameter Tables
- CLI Batch File
- ASCII Character Chart
- Specifications
- Technical Support
- Statement of Warranty
- Regulatory Compliance

Installation and Initialization AP-4000 Series User Guide
Initialization
33
Figure 2-10 Scan Tool Change Screen
c.
Set IP Address Type to Static.
d. Enter a static IP Address for the AP in the field provided. You must assign the unit a unique address that is
valid on your IP subnet. Contact your network administrator if you need assistance selecting an IP address for
the unit.
e. Enter your network’s Subnet Mask in the field provided.
f. Enter your network’s Gateway IP Address in the field provided.
g. Enter the SNMP Read/Write password in the Read/Write Password field (for new units, the default SNMP
Read/Write password is “public”).
NOTE: The TFTP Server IP Address and Image File Name fields are only available if ScanTool detects that
the AP does not have a valid software image installed. See Client Connection Problems.
h. Click OK to save your changes.
i. The Access Point will reboot automatically and any changes you made will take effect.
j. When prompted, click OK a second time to return to the Scan List screen.
k. Click Cancel to close the ScanTool.
Logging In
Once the AP has a valid IP Address and an Ethernet connection, you may use your web browser to monitor and
configure the AP. (To configure and monitor using the command line interface, see Command Line Interface (CLI).)
1. Open a Web browser on a network computer.
– The HTTP interface supports the following Web browsers:
• Microsoft® Internet Explorer 6 with Service Pack 1 or later
• Netscape® 7.1 or later
2. If necessary, disable the browser’s Internet proxy settings. For Internet Explorer users, follow these steps:
–Select Tools > Internet Options.
– Click the Connections tab.
– Click LAN Settings.
– If necessary, remove the check mark from the Use a proxy server box.