
Access Point User Guide
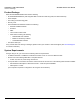
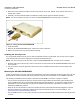
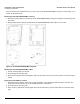
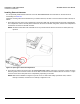
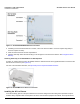
Table Of Contents
- Introduction
- Installation and Initialization
- System Status
- Advanced Configuration
- System
- Network
- Interfaces
- Management
- Filtering
- Alarms
- Bridge
- QoS
- Radius Profiles
- SSID/VLAN/Security
- Monitoring
- Commands
- Troubleshooting
- Command Line Interface (CLI)
- General Notes
- Command Line Interface (CLI) Variations
- CLI Command Types
- Using Tables and Strings
- Configuring the AP using CLI commands
- Set Basic Configuration Parameters using CLI Commands
- Set System Name, Location and Contact Information
- Set Static IP Address for the AP
- Change Passwords
- Set Network Names for the Wireless Interface
- Enable 802.11d Support and Set the Country Code
- Enable and Configure TX Power Control for the Wireless Interface(s)
- Configure SSIDs (Network Names), VLANs, and Profiles
- Download an AP Configuration File from your TFTP Server
- Backup your AP Configuration File
- Set up Auto Configuration
- Other Network Settings
- Configure the AP as a DHCP Server
- Configure the DNS Client
- Configure DHCP Relay
- Configure DHCP Relay Servers
- Maintain Client Connections using Link Integrity
- Change your Wireless Interface Settings
- Set Ethernet Speed and Transmission Mode
- Set Interface Management Services
- Configure Syslog
- Configure Intra BSS
- Configure Wireless Distribution System
- Configure MAC Access Control
- Set RADIUS Parameters
- Set Rogue Scan Parameters
- Set Hardware Configuration Reset Parameters
- Set VLAN/SSID Parameters
- Set Security Profile Parameters
- CLI Monitoring Parameters
- Parameter Tables
- CLI Batch File
- ASCII Character Chart
- Specifications
- Technical Support
- Statement of Warranty
- Regulatory Compliance
Installation and Initialization AP-4000 Series User Guide
Hardware Installation
28
Installing External Antennas
You can optionally install external antennas on the AP-4000/4000M/4900M. For information on the AP’s antenna
functionality, see Antennas.
Follow the mounting instructions included with your external antenna, and then connect the antenna cable to the AP, as
follows:
1. Press down near the center of the compartment covering and slide open the external antenna access compartments.
The compartment closer to the LED panel contains the connectors for the 802.11b/g radio, and the other compartment
contains the connectors for the 802.11a radio.
NOTE: AP-4000 models 8670-US2 and 8670-AU do not provide external antenna connectors for 5GHz (802.11a)
operation.
Figure 2-6 Opening the Antenna Compartment
2. There are four antenna connectors in the AP-4000/4000M/4900M, labeled 1 through 4. Connectors 1 and 2 are for the
802.11b/g radio, and connectors 3 and 4 and for the 802.11a radio.Connect the antenna cable to connector 1 or 4 (the
connector closer to the LED panel in the compartment), depending on the radio.
NOTE: When the AP-4900M is configured to operate in the 4.9 GHz Public Safety operational mode, antenna
diversity is disabled, and antenna 3 is statically configured for use.