
Access Point User Guide
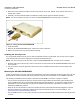
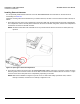
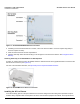
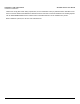
Table Of Contents
- Introduction
- Installation and Initialization
- System Status
- Advanced Configuration
- System
- Network
- Interfaces
- Management
- Filtering
- Alarms
- Bridge
- QoS
- Radius Profiles
- SSID/VLAN/Security
- Monitoring
- Commands
- Troubleshooting
- Command Line Interface (CLI)
- General Notes
- Command Line Interface (CLI) Variations
- CLI Command Types
- Using Tables and Strings
- Configuring the AP using CLI commands
- Set Basic Configuration Parameters using CLI Commands
- Set System Name, Location and Contact Information
- Set Static IP Address for the AP
- Change Passwords
- Set Network Names for the Wireless Interface
- Enable 802.11d Support and Set the Country Code
- Enable and Configure TX Power Control for the Wireless Interface(s)
- Configure SSIDs (Network Names), VLANs, and Profiles
- Download an AP Configuration File from your TFTP Server
- Backup your AP Configuration File
- Set up Auto Configuration
- Other Network Settings
- Configure the AP as a DHCP Server
- Configure the DNS Client
- Configure DHCP Relay
- Configure DHCP Relay Servers
- Maintain Client Connections using Link Integrity
- Change your Wireless Interface Settings
- Set Ethernet Speed and Transmission Mode
- Set Interface Management Services
- Configure Syslog
- Configure Intra BSS
- Configure Wireless Distribution System
- Configure MAC Access Control
- Set RADIUS Parameters
- Set Rogue Scan Parameters
- Set Hardware Configuration Reset Parameters
- Set VLAN/SSID Parameters
- Set Security Profile Parameters
- CLI Monitoring Parameters
- Parameter Tables
- CLI Batch File
- ASCII Character Chart
- Specifications
- Technical Support
- Statement of Warranty
- Regulatory Compliance

Installation and Initialization AP-4000 Series User Guide
Hardware Installation
25
Hardware Installation
Required Materials
• AP-4000/4000M/AP-4900M unit
• Mounting bracket with screws
• Power adapter
• Security cover
• Quick Start Flyer
Perform the following procedures to install the AP hardware:
• Cabling the AP-4000/4000M/4900M
• Installing the Security Cover
• Mounting the AP-4000/4000M/4900M
• Installing External Antennas
Cabling the AP-4000/4000M/4900M
Connect cables to the AP as follows:
1. Provide power to the AP, as follows:
a. Plug the power cord into the power jack (the left port) and connect the unit to an AC power outlet (100~240V,
50~60Hz).
b. If using Active Ethernet, connect power to the unit from a DC injector device, such as the ORiNOCO 1-Port Active
Ethernet DC Injector hub.
NOTE:
Before installing and using this product, see the Regulatory Compliance section.
NOTE:
Avant l’installation et l’utilisation de ce produit, veuillez vous référer à la partie « Regulatory
Compliance » (conformité aux réglementations).
NOTA:
Prima di installare ed utilizzare questo prodotto, fare riferimento alla sezione relativa alla “Regulatory
Compliance” (conformità alle norme).
ANMERKUNG:
Bitte lesen Sie vor der Installation und Verwendung dieses Produkts im Abschnitt „Regulatory
Compliance".
NOTA:
Antes de instalar y usar este producto, consulte la sección "Regulatory Compliance” (Cumplimiento
de la normativa).
注記 :
製品をインストールしてご使用になる前に、 の「Regulatory Compliance」セクションを参照し、使用許諾
に関する重要な事項を確認してください .