
Access Point User Guide
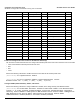
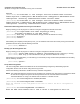

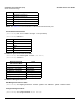
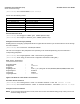
Table Of Contents
- Introduction
- Installation and Initialization
- System Status
- Advanced Configuration
- System
- Network
- Interfaces
- Management
- Filtering
- Alarms
- Bridge
- QoS
- Radius Profiles
- SSID/VLAN/Security
- Monitoring
- Commands
- Troubleshooting
- Command Line Interface (CLI)
- General Notes
- Command Line Interface (CLI) Variations
- CLI Command Types
- Using Tables and Strings
- Configuring the AP using CLI commands
- Set Basic Configuration Parameters using CLI Commands
- Set System Name, Location and Contact Information
- Set Static IP Address for the AP
- Change Passwords
- Set Network Names for the Wireless Interface
- Enable 802.11d Support and Set the Country Code
- Enable and Configure TX Power Control for the Wireless Interface(s)
- Configure SSIDs (Network Names), VLANs, and Profiles
- Download an AP Configuration File from your TFTP Server
- Backup your AP Configuration File
- Set up Auto Configuration
- Other Network Settings
- Configure the AP as a DHCP Server
- Configure the DNS Client
- Configure DHCP Relay
- Configure DHCP Relay Servers
- Maintain Client Connections using Link Integrity
- Change your Wireless Interface Settings
- Set Ethernet Speed and Transmission Mode
- Set Interface Management Services
- Configure Syslog
- Configure Intra BSS
- Configure Wireless Distribution System
- Configure MAC Access Control
- Set RADIUS Parameters
- Set Rogue Scan Parameters
- Set Hardware Configuration Reset Parameters
- Set VLAN/SSID Parameters
- Set Security Profile Parameters
- CLI Monitoring Parameters
- Parameter Tables
- CLI Batch File
- ASCII Character Chart
- Specifications
- Technical Support
- Statement of Warranty
- Regulatory Compliance

Command Line Interface (CLI) AP-4000 Series User Guide
Other Network Settings
179
[Device-Name]>set telifbitmask <(see below)>
Choose from the following values:
Set Communication Ports
[Device-Name]>set httpport <HTTP port number (default is 80)>
[Device-Name]>set telport <Telnet port number (default is 23)>
Configure Secure Socket Layer (HTTPS)
Enabling SSL and configuring a passphrase allows encrypted Secure Socket Layer communications to the AP through
the HTTPS interface.
[Device-Name]>set sslstatus <enable/disable>
The user must change the SSL passphrase when uploading a new certificate/private key pair, which will have a
corresponding passphrase.
[Device-Name]>set sslpassphrase <SSL certificate passphrase>
[Device-Name]>show http (to view all HTTP configuration information including SSL.)
HTTP Group Parameters
=====================
httpifbitmask : 15
httppasswd : ********
httpport : 80
httphelplink : file:///C:/Program Files/ORiNOCO/AP4xxx/HTML/index.htm
httpsetupwiz : disable
sslstatus : enable
sslpassphrase : ********
Figure A-15 Result of “show HTTP” CLI Command
Set Telnet Session Timeouts
[Device-Name]>set tellogintout <time in seconds between 1 and 300 (default is 30)>
[Device-Name]>set telsessiontout <time in seconds between 1 and 36000 (default is 900)>
Configure Serial Port Interface
NOTE: To avoid unexpected performance issues, leave Flow Control at the default setting (none) unless you are sure
what this setting should be.
Interface Bitmask Description
0 or 2 = Disable (all interfaces) All management channels disabled
1 or 3 = Ethernet only Ethernet only enabled
4 or 6 = Wireless A only Wireless A only enabled
8 or 10 = Wireless B only Wireless B only enabled
12 = Wireless A and Wireless B Wireless A and Wireless B enabled
13 or 15 = All interfaces All management channels enabled