
Access Point User Guide
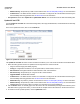
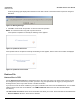
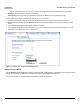
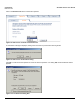
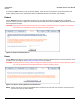
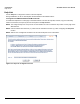
Table Of Contents
- Introduction
- Installation and Initialization
- System Status
- Advanced Configuration
- System
- Network
- Interfaces
- Management
- Filtering
- Alarms
- Bridge
- QoS
- Radius Profiles
- SSID/VLAN/Security
- Monitoring
- Commands
- Troubleshooting
- Command Line Interface (CLI)
- General Notes
- Command Line Interface (CLI) Variations
- CLI Command Types
- Using Tables and Strings
- Configuring the AP using CLI commands
- Set Basic Configuration Parameters using CLI Commands
- Set System Name, Location and Contact Information
- Set Static IP Address for the AP
- Change Passwords
- Set Network Names for the Wireless Interface
- Enable 802.11d Support and Set the Country Code
- Enable and Configure TX Power Control for the Wireless Interface(s)
- Configure SSIDs (Network Names), VLANs, and Profiles
- Download an AP Configuration File from your TFTP Server
- Backup your AP Configuration File
- Set up Auto Configuration
- Other Network Settings
- Configure the AP as a DHCP Server
- Configure the DNS Client
- Configure DHCP Relay
- Configure DHCP Relay Servers
- Maintain Client Connections using Link Integrity
- Change your Wireless Interface Settings
- Set Ethernet Speed and Transmission Mode
- Set Interface Management Services
- Configure Syslog
- Configure Intra BSS
- Configure Wireless Distribution System
- Configure MAC Access Control
- Set RADIUS Parameters
- Set Rogue Scan Parameters
- Set Hardware Configuration Reset Parameters
- Set VLAN/SSID Parameters
- Set Security Profile Parameters
- CLI Monitoring Parameters
- Parameter Tables
- CLI Batch File
- ASCII Character Chart
- Specifications
- Technical Support
- Statement of Warranty
- Regulatory Compliance

Troubleshooting AP-4000 Series User Guide
Symptoms and Solutions
150
6. Perform the Reset to Factory Default Procedure in this guide. This will reset the unit to “DHCP” mode. If there is a
DHCP Server on the network, the DHCP Server will assign an IP Address to the AP.
HTTP Interface or Telnet Interface Does Not Work
1. Make sure you are using a compatible browser:
– Microsoft Internet Explorer 6 with Service Pack 1 or later
– Netscape 7.1 or later
2. Make sure you have the proper IP address. Enter your Access Point’s IP Address in the browser address bar, similar
to this example:
http://192.168.1.100
When the Enter Network Password window appears, leave the User Name field empty and enter the HTTP
password in the Password field. The default HTTP password is “public”.
3. Use the CLI over the serial port to check the IP Access Table, which can be restricting access to Telnet and HTTP.
HTML Help Files Do Not Appear
1. Verify that the HTML Help files are installed in the default directory:
C:\Program Files\ORiNOCO\AP4xxxx\HTML\
If the Help files are not located in this folder, contact your network administrator to find out where the Help files are
located on your server.
2. Copy the entire folder to your Web server.
3. Perform the following steps to specify the path for the Help files:
a. Click the Commands button in the HTTP interface.
b. Select the Help tab located at the top of the screen.
c. Enter the pathname where the Help files are located in the Help Link box. This must be an HTTP address.
d. Click OK.
Telnet CLI Does Not Work
1. Make sure you have the proper IP Address. Enter your AP IP address in the Telnet connection dialog, from a DOS
prompt, type:
C:\> telnet <AP IP Address>
2. Use the CLI over the serial port to check the IP Access Table, which can be restricting access to Telnet and HTTP.
TFTP Server Does Not Work
1. Make sure the TFTP Server has been started.
2. Verify the IP address of the TFTP Server. The server may be local or remote, so long as it has a valid IP address.
3. Configure the TFTP Server to “point” to the folder containing the file to be downloaded (or to the folder in which the file
is to be uploaded).
4. Verify that you have entered the proper AP Image file name (including the file extension) and directory path (if
needed).
5. If you have a problem uploading a file, verify that the TFTP server is configured to allow uploads (typically the default
setting is to allow only downloads).
Client Connection Problems
Client Software Finds No Connection
Make sure you have configured your client software with the proper Network Name and Security settings. Network
Names and WEP Keys are typically allocated and maintained by your network administrator.