
Specifications


Installation and Initialization Tsunami MP.11 5012-SUR Installation and Management
Installation Procedure
18
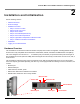
Step 2: Attach Cables
NOTE: Depending on your application and location, you may find it easier to mount the unit before you attach cables to
it. If this is the case, remove the cable cover (as explained in step 1 below), and then complete Step 3: Mount
Unit to Pole. Return to this step for cabling instructions.
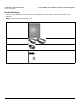
1. With the laying unit face down, depress both buttons on the back of the 5012-SUR unit, and pull the plastic cover
downward to open. Remove cover.
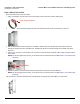
2. Connect one end of an Ethernet cable (5.5 mm/.217 in OD maximum; not supplied) to the unit’s LAN port.
3. Route the Ethernet cable as shown below.
4. Connect the other end of the Ethernet cable to the Data and Power Out port of the DC Injector.
NOTE: You must use an 802.3af-compliant power injector, such as the Proxim 1-Port Power Injector (P/N 4301-xx).
5. Connect one end of a second Ethernet cable (not supplied) to the Data In port of the DC Injector and the other end to
a switch, hub, patch panel, or single computer:
• Use a straight-through Ethernet cable if you are connecting the unit to a switch, hub, or patch panel.
• Use a cross-over Ethernet cable or adapter if you are connecting the unit to a single computer or most router
ports.