
Specifications

Procedures Tsunami MP.11 5012-SUR Installation and Management
Image File Download with the Bootloader
114
Image File Download with the Bootloader
To download the image, you will need an Ethernet connection to the computer on which the TFTP server resides. This
can be any computer on the LAN or connected to the unit with a cross-over Ethernet cable. You must also connect the
unit to a computer with a standard serial cable and use a terminal emulator, such as HyperTerminal. From the terminal
emulator, enter CLI Commands to set the IP address and download an image file, as described below.
1. Set up the TFTP server as described in TFTP Server Setup. Make sure your TFTP server is running.
2. Download the latest software from http://support.proxim.com.
3. Copy the latest software updates to your TFTP server’s root directory.
4. Use a straight-through serial cable to connect the unit’s serial port to your computer’s serial port.
5. Open your terminal emulation program (like HyperTerminal) and set the following connection properties:
• Connect using: Com Port: <COM1, COM2, etc., depending on your computer>
• Port Settings:
– Baud rate: 9600
–Data Bits: 8
– Stop bits: 1
– Flow Control: None
– Parity: None
• Under File > Properties > Settings > ASCII Setup, enable the Send line ends with line feeds option.
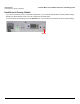
6. Press the RESET button on the unit.
The terminal display shows Power On Self Tests (POST) activity. After approximately 30 seconds, a message
indicates: Sending Traps to SNMP manager periodically. After this message appears, the bootloader prompt
appears.
7. Enter only the following statements:
[Device name]> show (to view configuration parameters and values)
[Device name]> set ipaddrtype static
[Device name]> set ipaddr <Unit’s IP Address>
[Device name]> set ipsubmask <IP Mask>
[Device name]> set tftpipaddr <TFTP Server IP Address>
[Device name]> set tftpfilename <Image File Name, including file extension>
[Device name]> set ipgw <Gateway IP Address>
[Device name]> show (to confirm your new settings)
[Device name]> reboot
Example:
[Device name]> show
[Device name]> set ipaddrtype static
[Device name]> set ipaddr 10.0.0.12
[Device name]> set ipsubmask 255.255.255.0
[Device name]> set tftpipaddr 10.0.0.20
[Device name]> set tftpfilename MyImage.bin
[Device name]> set ipgw 10.0.0.30
[Device name]> show
[Device name]> reboot
The AP will reboot and then download the image file. You should see downloading activity begin after a few seconds
within the TFTP server’s status screen.
After a Forced Reload procedure, the 5012-SUR returns to factory default settings and must be reconfigured. ScanTool
can be used to set the system name and IP address.
To access the 5012-SUR see Logging in to the Web Interface.