
Install guide

MP.11 and MP.11a Quick Install Guide
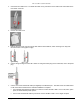
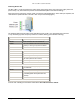
7. Place the back cover on the mounting location and mark the center of the three mounting holes.
8. Remove the cover from the wall and drill a hole at each of the locations you marked. Each hole should be
wide enough to hold a mounting plug (6 mm x 35 mm).
9. Insert a plug into each hole.
(Four 6 mm x 35 mm plugs are provided; you need to use only three of these for wall mounting.)
10. Insert a screw into each of the mounting holes molded into the back cover.
(Four 3.5 mm x 40 mm pan-head screws are provided; you need to use only three of these for wall mounting.)
11. Insert the screws into the wall plugs; use a screwdriver to tighten the screws and attach the back cover to the
wall.
12. Attach Ethernet and power cables to the MP.11/MP.11a unit, as necessary.
13. Snap the unit into the back cover, replace the front cover, and replace the cable cover.
14. Turn on the MP.11/MP.11a (see “Switching On the Unit” on page 9).
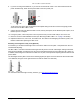
Ceiling Mounting
Follow these steps to mount the MP.11/MP.11a to a ceiling:
1. If the MP.11/MP.11a’s power supply is plugged in, unplug it.
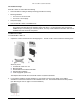
2. Use a Phillips screwdriver to attach the metal base to the underside of the MP.11/MP.11a, if you have not
already done so. See “Installation Procedure” on page 4 for an illustration.
3. Feed a mounting screw through each of the four rubber feet. The MP.11/MP.11a comes with four 3.5 mm x
40 mm pan-head screws.
4. Remove the screws from the rubber feet.
5. Turn the MP.11/MP.11a upside down and position the base against the ceiling where you want to mount the
unit.
6. Mark the center of the four mounting holes in the rubber feet.
7. Set the MP.11/MP.11a aside and drill a hole at each of the locations you marked above. Each hole should be
wide enough to hold a mounting plug (6 mm x 35 mm).
8. Insert a plug into each hole. The MP.11/MP.11a comes with four 6 mm x 35 mm plugs.
9. Insert the screws into the holes you made previously in the rubber feet.
10. Insert the screws into the mounting plugs. Use a screwdriver to tighten the screws and attach the
MP.11/MP.11a’s metal base to the ceiling.
Copyright © 2005 Proxim Corporation. All rights reserved. 8