
Install guide

MP.11 and MP.11a Quick Install Guide
The Product Package
Each MP.11/MP.11a comes with the following:
▪ One metal base for ceiling or desktop mounting (includes two screws)
▪ Mounting hardware
º Four 3.5 mm x 40 mm screws
º Four 6 mm x 35 mm plugs
▪ One power supply
▪ One Tsunami MP.11/MP.11a Installation CD
Note: All software CDs that come with your Tsunami products include a readme.txt or readme.html file. This
file contains information about the software version and drivers. You are advised to print and read the
readme file prior to installing your Tsunami products, as it may contain additional information that was not
available when this document was printed.
Installation Procedure
To install the MP.11/MP.11a:
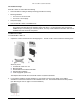
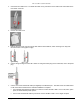
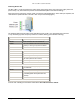
1. Unpack the unit and accessories from the shipping box. The MP.11/MP.11a kit contains the following items:
Shown in picture:
1 Tsunami MP.11/MP.11a unit
2 Mounting stand
are CD-ROM 3 Documentation and softw
4 Wall mounting hardware
5 Power supply with power cord
The shipment also includes the Tsunami MP.11/MP.11a Quick Install Guide.
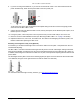
2. If you intend to install the unit free-standing, or if you intend to mount it to the ceiling, use a Phillips
screwdriver to attach the metal base to the underside of the unit. The metal base and screws are provided
(see “Mounting the Unit” on page 7 for more information).
Copyright © 2005 Proxim Corporation. All rights reserved. 4