
Specifications


Installation and Initialization MP.11 5054-R/2454-R Installation and Management
Initialization
34
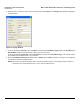
2. Select the unit for which you want to set the IP address and click Change. The Change dialog window is displayed,
as shown below.
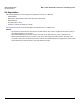
Figure 2-5 Change Window
3. To set the IP address manually, ensure that Static is selected as the IP Address Type and fill in the IP Address and
Subnet Mask suitable for the LAN subnet to which the unit is connected.
To set the IP address dynamically, ensure that Dynamic is selected as the IP Address Type. The unit will request
its IP address from a DHCP server on your network.
4. Enter the Read/Write Password (the default value is public) and click OK to confirm your changes. The respective
unit reboots to make the changes effective.
NOTE: The number of asterisks displayed after you enter the password does not necessarily equal the number of
characters in the actual password string. This is done for added security.