
Specifications


Installation and Initialization MP.11 5054-R/2454-R Installation and Management
Installation Procedure
26
Step 3: Connect the Cables
1. If you have not already done so, connect the normal RJ45 connector on an outdoor-rated CAT5 cable to the “Data and
Power Out” port on the power injector.
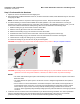
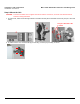
2. Attach the other end of the CAT5 cable with RJ45 connector to the Power and Ethernet port on the back of the unit
(see the following figure). Note that the first attachment of this cable is meant to verify operation and configure the
unit; the final attachment (with proper torque) and weatherproofing are to be done after the unit has been installed in
the location at which it will operate (Step 8: Complete Installation)
CAUTION: Do not over-tighten the connector nuts; do not use a wrench to tighten the connectors!
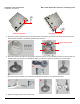
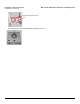
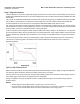
3. To connect the unit through a hub or a switch to a PC, use a straight-through Ethernet cable between the network
interface card in the PC and the hub, and between the hub and the RJ45 “Data In” port on the power injector.
If you are connecting the PC directly to the unit, use a crossover Ethernet cable between the network interface card
in the PC and the RJ45 “Data In” port on the power injector.