
Installation guide
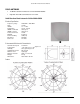

Tsunami MP.11 Recommended Antennas
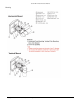
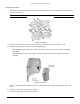
Attach Mounting Bracket
6. Secure on the back with the lock washers and nuts.
7. Recheck the dipole feed assembly for the proper polarity.
8. Attach the feed on the front with 2 carriage bolts. Secure on the back with the lock washers and nuts.
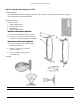
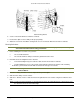
Mounting the Antenna
DANGER! Installation of antenna near power lines is dangerous! Before you proceed, make sure you
have read and understood the safety precautions.
1. Before climbing the roof, make sure you have:
º The assembled antenna.
º The U-bolts and mast clamps to mount the grid antenna to the mast.
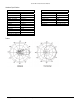
2. Determine the desired alignment of the antenna:
º For horizontal alignment you need both U-bolts and the 4 lock washers and nuts.
º For tilted alignment, you use only a single U-bolt and two lock washers and nuts. This mounting
method lets you mount the antenna with an elevation in 10 degrees increments.
CAUTION! Tilted alignment is not suitable for environments where the antenna is subject to high
wind conditions.
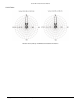
3. Place the U-bolt(s) around the mast as depicted in the previous figure.
4. Slide the mast clamps over the U-bolts.
5. Slide the ‘L’ bracket over the U-bolts and fasten the grid antenna to the U-bolts using the lock washers and
nuts.
Note: For tilted elevation mounting, use the flat plate washer on the adjustable tilt slot to mount and secure
the antenna to the desired elevation angle.
Copyright © 2005 Proxim Wireless Corporation. All rights reserved. 55