
User's Manual

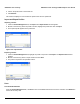


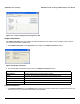


Table Of Contents
- Introduction
- Installation
- Wireless Topologies
- ORiNOCO Client Utility
- Troubleshooting
- Specifications
- Technical Services and Support
- Glossary
- Safety and Regulatory Information

ORiNOCO Client Utility ORiNOCO
®
802.11a/b/g/n USB Adapter User Guide
57
Figure 4-50 Network Managed Test
When the Select profile drop down gets enabled?
1. Select a profile from the Select Profile dropdown and click Start Test to start the diagnostic mode. In diagnostic
channel mode the utility shows the status of the following tests:
• Diagnostic channel mode supported by the client\
• Adapter available
• Adapter status
• Driver diagnostic capable
• Diagnostic profile(s) available
2. Click Save Report to save the report. The Save Report dialog box is displayed. Browse to the directory where to save
the report. Enter a file name and click Save.
3. Click Stop Test to stop the diagnostic channel mode, if it started.
4. Click Close to close the Network Managed Test Utility window.
NOTE: The current release of ORiNOCO
®
802.11n USB Adapter does not support this functionality.
Configure TCP/IP
1. After configuring the wireless network adapter properties, open the Control Panel and click on the link Network and
Internet Connections.
2. Find the Local Area Connection associated with the wireless network adapter. Right-click that connection, and click
Properties.
3. Select Internet Protocol (TCP/IP) and click Properties.
• Select the radio button Use the following IP address, then enter an IP address and Subnet mask. Assigning an
IP address and Subnet mask allows stations to operate in access point mode (infrastructure mode) or in ad hoc
mode and to have Internet access. Default gateway and DNS server information is also required.
• When DHCP server is available in your network, then select the radio button Obtain an IP address
automatically, to obtain the IP address, gateway and DNS server IP addresses from the corporate IT staff.
4. Click OK to finish.