
User's Manual

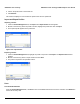


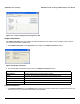


Table Of Contents
- Introduction
- Installation
- Wireless Topologies
- ORiNOCO Client Utility
- Troubleshooting
- Specifications
- Technical Services and Support
- Glossary
- Safety and Regulatory Information

ORiNOCO Client Utility ORiNOCO
®
802.11a/b/g/n USB Adapter User Guide
54
Ordering the auto selected profiles:
1. Highlight a profile from the Auto Selected Profiles box.
2. Click Move Up, Move Down, or Remove as appropriate.
3. The first profile in the Auto Selected Profiles box has highest priority, and the last profile has lowest priority.
4. Click OK to close the Auto Profile Selection Management dialog box.
5. Select the Auto Select Profiles check box under the Profile Management tab.
6. Save the modified configuration file.
When auto profile selection is enabled by selecting the Auto Select Profiles checkbox under the Profile Management
tab, the client adapter scans for an available network. The profile with the highest priority and the same SSID as one of
the found networks is the one that is used to connect to the network. If the connection fails, the client adapter tries the
next highest priority profile that matches the SSID, and so on.
Figure 4-46 Auto Profile Selection Management
Diagnostics Tab
The Diagnostics tab contains general information about the receiver and transmitter statistics, the wireless network
adapter and the network driver interface specification (NDIS) driver. The Diagnostics tab does not require any
configuration.
It lists the following receive and transmit diagnostics for frames received by or transmitted by the wireless network
adapter:
• Multicast packets transmitted and received
• Broadcast packets transmitted and received
• Unicast packets transmitted and received
• Total bytes transmitted and received
There are three buttons under the Diagnostics tab:
• Adapter Information
• Advanced Statistics
• Network Managed Test