
User guide


Installation and Initialization AP-4000MR User Guide
Hardware Installation
25
• Step 10: Weatherproof the Connectors
• Step 11: Install Documentation and Software
Step 1: Choose a Location
To make optimal use of the unit, you must find a suitable location for the hardware. The range of the radio unit largely
depends upon the position of the antenna. Proxim recommends you do a site survey, observing the following
requirements, before mounting the hardware.
• The location must allow easy disconnection of power to the radio if necessary.
• Air must be able to flow freely around the hardware.
• The radio unit must be kept away from vibration and excessive heat.
• The installation must conform to local regulations at all times.
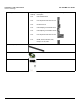
The unit is designed to directly mount to a pole or wall. Using the supplied brackets and hardware, you can mount it to a
1.25 inch to 4.5-inch pole (outside diameter). Using just one of the pole mounting brackets, you can mount it to a wall or
other flat surface.
CAUTION: Proxim recommends the use of a lightning arrestor at the building ingress point. You can purchase the
Proxim Lightning Protector; see the documentation that comes with the Lightning Protector for more
information and installation instructions.
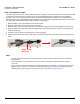
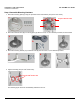
Step 2: Unpack Shipping Box
1. Unpack the unit and accessories from the shipping box.
2. Note the Ethernet and MAC addresses of the unit, as well as the serial number. The addresses may be used when
configuring the unit. The serial number is required to obtain support from Proxim. Keep this information in a safe
place.