
Installation Guide

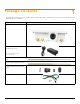
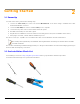
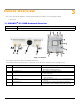
Table Of Contents
- Package Contents
- Getting Started
- Device Overview
- Device Installation
- Technical Specifications
- Device Models
- Accessories
- OFDM Modulation Rates
- Wireless Protocol
- Interfaces
- Transmit Power Specifications (5.150 to 5.850) GHz
- Transmit Power Specifications (2.400 to 2.484) GHz
- Receive Sensitivity (5.150 - 5.850) GHz
- Receive Sensitivity (2.400 to 2.484) GHz
- Power Supply
- Hardware Specifications
- Physical Specifications
- Environmental Specifications
- MTBF
- 6 Recommended Antennas
- Antenna Installation
- Measuring Signal Performance
- Lightning Protection
- Abbreviations
- Warranty and Technical Support
- Safety & Regulatory Information

ORiNOCO
®
AP-9200R - Hardware Installation Guide 10
4
Device Installation
4.1 Installation Procedure
This section describes the steps to install and mount the device(s).
: The device must be installed by a trained professional who is familiar with radio frequency planning and
regulatory limits.
Please refer Safety & Regulatory Information for details.
Perform the following steps to install and mount the device
Step 1: Plan for Installation
There are several planning factors to be considered before installing the device. In addition to selecting the installation site,
you should do the following:
Determine:
• System frequency plan
• Required antenna mounting height to obtain proper path clearance
• Required transmission line types (like RF cable, waveguides) and lengths
Plan for:
• Device’s continuous power consumption needs
• Lightning protection and system grounding
• Hardware mounting
• Cable installation includi
ng ingress
• Pre-testing equipment
(back-to-back test)
Step 2: Choose a Location
To make optimal use of the device, you must find a suitable location to install the hardware. The range of the radio device
largely depends upon the position of the antenna. Proxim recommends you do a site survey, observing the following
requirements, before mounting the hardware.
• The location must allow easy disconnection of power to the radio, if necessary.
• Ensure free flow of air around the hardware.
• The radio device must be kept away from vibration and excessive heat.
• The installation must conform to local regulations at all times. For details, please refer to Safety & Regulatory
Information.
The devices are designed to directly mount to a pole. By using the supplied brackets and hardware, you can mount them to
a 1.5 to 3.25 inch pole (outside diameter).