
User's Manual Part 1


Installation and Initialization MeshMAX 5054 Series User Guide
36
Subscriber Initialization
Connecting to the module requires either:
• A direct physical connection with an Ethernet cable or with a serial RS-32 cable
• A network connection
Connecting with the Ethernet cable allows you to access the unit through a terminal emulation program, such as
HyperTerminal. (See “HyperTerminal Connection Properties” in the MeshMAX 5054 User Guide.
Setting the IP Address
With ScanTool (a software utility that is included on the product installation CD), you can find out the current IP address of
the unit and, if necessary, change it so that is appropriate for your network.
ScanTool lets you find the IP address of a module by referencing the MAC address in a Scan List, or to assign an IP
address if the correct one has not been assigned. The tool automatically detects the units installed on your network
segment, regardless of IP address, and lets you configure each unit’s IP settings. In addition, you can use ScanTool to
download new software to a unit that does not have a valid software image installed.
To discover and set/change the IP address of the unit:
Run ScanTool on a computer connected to the same LAN subnet as the unit, or a computer directly connected to the
module with a cross-over Ethernet cable. Double-click the ScanTool icon on the Windows desktop to launch the program.
If the icon is not on your desktop, click Start > All Programs > MeshMAX 5054 series > ScanTool.
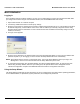
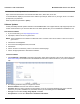
ScanTool scans the subnet and displays the module it finds in the main window. If necessary, click Rescan to re-scan the
subnet and update the display. You can assign a new IP address to one module, even if more than one module has the
same (default) IP address 10.0.0.1, but the new IP address must be unique to allow the use of the management
interfaces.
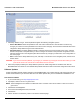
Select the module for which you want to set the IP address and click Change. The Change dialog window is displayed.
To set the IP address manually, ensure that Static is selected as the IP Address Type and fill in the IP Address and
Subnet Mask suitable for the LAN subnet to which the uni is connected.
To set the IP address dynamically, ensure that Dynamic is selected as the IP Address Type. The module will request its
IP address from a DHCP server on your network.
Enter the Read/Write Password (the default value is public) and click OK to confirm your changes. The respective module
reboots to make the effective.
Accessing the Web Browser
To access the module with a Web Browser:
Start a Web browser and enter the IP address of the module in the Address box (for example, http://10.0.0.1).
A login window is displayed. Do not fill in the User name; enter only the default password public.
Upon successful login, the System Status window is displayed.
Accessing the Command Line Interface
The CLI is accessible through the Serial RS-232 cable connected through the network, or with a cross-over Ethernet
cable between the computer and the module’s serial port.
Ethernet Port
To use the CLI through the Ethernet port, you must have a telnet program, and the module’s IP address.