
User's Manual Part 1


Installation and Initialization MeshMAX 5054 Series User Guide
27
When the unit is powered on, it performs startup diagnostics. When startup is complete, the LEDs show the unit’s
operational state, as follows:
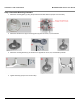
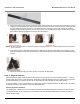
Step 9: Tighten the Cables
1. Apply two wraps of Teflon tape around the threads of the unit’s RJ45 jack (A) in a clockwise direction.
2. Make sure that the red rubber gasket is still seated in the sealing cap of the sealing cap/lock nut assembly (B).
3. Slide the sealing cap/lock nut assembly (B) over the RJ45 jack (A) and thread onto enclosure. Hand tighten first,
then use a pipe wrench or similar tool to tighten one more quarter turn.
CAUTION: Do not over-tighten!
4. Tighten the lock nut (C) (Torque 4 N.m/35 in-lbs).
5. Thread the sealing nut (D) onto the sealing cap/lock nut assembly (B) and tighten (Torque 3 N.m/25 in-lbs).
CAUTION: The lock nut (C) on the sealing cap/lock nut assembly (B) must be fully tightened over the RJ45 connector
before the sealing nut (D) is fully tightened. Otherwise, the Ethernet cable may twist and damage.
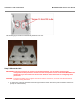
Step 10: Weatherproof the Connectors
After you have fully assembled and tightened the cable, use the provided self-fusing, rubber-based tape strip and
electrical tape (not provided; Proxim recommends Scotch™ Super 33+ Vinyl Electrical Tape) to seal the connection, as
follows.
1. Remove the film liner from the rubber-based tape strip, and stretch the tape until it is approximately half of its
original width. This activates the self-fusing action of the tape, which will set up over time to create a single,
waterproof mass.
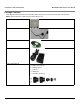
LED State Power/Ethernet LED Radio LED
Blinking Green Power is on, unit is booting up,
Ethernet link is down.
Mesh radios are being
initialized.
Steady Green Power is on, Ethernet link is up. Mesh radios are being
operational.