
User Guide

SAFETY RULES
Connecting the device to a power supply that does not meet the
quality requirements specified in EN 50081-1, EN 50082-1, UL508,
EN 60950 will invalidate the warranty.
DANGER! Risk of electric shock! Even with the device turned off,
the outputs may be live. All assembly work should be ALWAYS
performed with the disconnected power circuit.
Test the operation of the controller by bringing your hand close to the sensing
part, paying attention to the LED diode - proximity detection is signaled by
the continuous light of the LED, while its periodic short blinks signals the
operation of the device.
"invisible" µWiFi action trigger
user guide
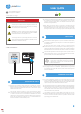
Download the free wBox application. If you have an Android mobile device,
you will find the application in the Play Store. For iOS devices the application
is in the App Store.
By using your mobile phone or tablet, connect it to the device wireless
network. To do this, enter to your smartphone or tablet settings, then go to
setting of the WiFi network and find the network name „proxiBox-xxxxxxxxxx”
where xxxxxxxxxx is the serial number of the device. Connect to this network.
Open the wBox application. A device will appear at the top of the screen. To
add it to the application, click on "+" on the right side of the name. To preconfi-
gure the controller, click on the default device name.
2
FIRST START
You can also set the configuration using the web browser
of your phone / tablet. After connecting to the wireless
network of the controller, turn on the browser and go
website www.blebox.eu
control with μWiFi technology
from any place in the World
Connect only in accordance with the diagram presented in the
manual. Improper connections may be dangerous, it can damage
the controller, and loss of the warranty.
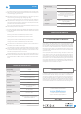
CONNECTION DIAGRAMS
proxibox
+
12 - 24V
DC
proxibox
µWiFi wireless controller
BleBox sp. z.o.o Kunickiego 65
54-616 Wrocław, Poland
Disconnect the installation supply voltage before installing the controller.
Remember that any mounting works should be carried out when the mains
voltage is disconnected (switch off the mains fuse or disconnect the power
cord from the mains socket).
1 INSTALLATION - BASICS
The controller should be installed in a place protected against adverse
environmental conditions, protected from third party access - in the flush box
or inside the enclosure of the controlled device. Remember that metallic
elements (wires, housing parts) have a negative influence on the range of the
device, and consequently the comfort of use. It is recommended that the
device be mounted in a stable and fixed position.
Familiarize yourself with the diagram and then proceed with the installation of
the controller. Pay special attention to the designation of the controller
connector. Connect the power wires: +12/+24V (red or black with a white
dotted line) and ground (black).
After making sure that the device is connected in accordance with the
diagram and that there are no metal components near the controller which
may accidentally cause short-circuit, start the device by turning on the power
(turning on the mains fuse or connecting the power cord to the power outlet).
3 OTHER DEVICE SETTINGS
Go to the configuration ("Settings" icon in the upper right corner of the
screen). In the "Main configuration" section, you can change the name of the
device that is displayed in the wBox application. The "Status LED enabled"
option allows you to turn off the built-in LED on the device.
The sensitivity level allows you to adjust the sensitivity to the type of material
behind which the sensor is placed. Glass, tiles, wood or plywood disturb the
electric capacity in various ways so it may be necessary to experimentally
select this value. A less sensitive device may not recognise the touch while an
over-sensitive device may excite itself.
In the "Buttons" section the "Interface Mode" option allows you to choose
between a simplified control interface that will only respond to short or long
clicks and a full control interface in which it is possible to activate specific
types of triggers on individual tabs.