
User's Manual
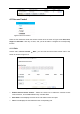
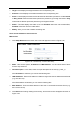
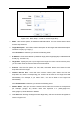
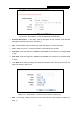
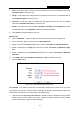
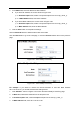
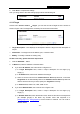
Table Of Contents
- Package Contents
- Chapter 1. Introduction
- Chapter 2. Connecting the Router
- Chapter 3. Quick Installation Guide
- Chapter 4. Configuring the Router
- Appendix A: FAQ
- Appendix B: Configuring the PC
- Appendix C: Specifications
- Appendix D: Glossary

RY/TP7231RY/TP723F " 522Odru"Yktgnguu"P"Tqwvgt"
- 62 -
2. We recommend that you click Ugvwr"Yk|ctf"button to finish all the following settings.
3. Click the submenu Jquv"qh"Ceeguu"Eqpvtqn in the left to enter the Host List page. Add a new
entry with the Host Description is Host_1 and MAC Address is 00-11-22-33-44-AA.
4. Click the submenu Vctigv"qh"Ceeguu"Eqpvtqn in the left to enter the Target List page. Add a
new entry with the Target Description is Target_1 and Domain Name is www.google.com.
5. Click the submenu Uejgfwng"qh"Ceeguu"Eqpvtqn in the left to enter the Schedule List page.
Add a new entry with the Schedule Description is Schedule_1, Day is Sat and Sun, Start
Time is 1800 and Stop Time is 2000.
6. Click the submenu Twng"qh"Ceeguu"Eqpvtqn in the left, Click Cff"Pgy000 button to add a new
rule as follows:
In Rule Name field, create a name for the rule. Note that this name should be unique, for
example Rule_1.
In Host field, select Host_1.
In Target field, select Target_1.
In Schedule field, select Schedule_1.
In Status field, select Enable.
Click Save to complete the settings.
Then you will go back to the Access Control Rule Management page and see the following list.
603304"Jquv"
Choose menu “Ceeguu" Eqpvtqn" →"Jquv”, you can view and set a Host list in the screen as
shown in Figure 4-53. The host list is necessary for the Access Control Rule.
Figure 4-53 Host Settings
Jquv"Fguetkrvkqp"/ Here displays the description of the host and this description is unique.
Kphqtocvkqp"/ Here displays the information about the host. It can be IP or MAC.
Oqfkh{"/ To modify or delete an existing entry.
Vq"cff"c"pgy"gpvt{."rngcug"hqnnqy"vjg"uvgru"dgnqy0"
1. Click the Cff"Pgy” button.