
User's Manual
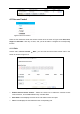
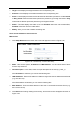
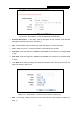
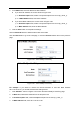
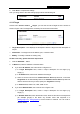
Table Of Contents
- Package Contents
- Chapter 1. Introduction
- Chapter 2. Connecting the Router
- Chapter 3. Quick Installation Guide
- Chapter 4. Configuring the Router
- Appendix A: FAQ
- Appendix B: Configuring the PC
- Appendix C: Specifications
- Appendix D: Glossary

RY/TP7231RY/TP723F " 522Odru"Yktgnguu"P"Tqwvgt"
- 55 -
Ygdukvg"Fguetkrvkqp"/"Description of the allowed website for the PC controlled.
Uejgfwng / The time period allowed for the PC controlled to access the Internet. For detailed
information, please go to “Ceeguu"Eqpvtqn" →" Uejgfwng”.
Oqfkh{ / Here you can edit or delete an existing entry.
Vq"cff"c"pgy"gpvt{."rngcug"hqnnqy"vjg"uvgru"dgnqy0"
1. Click the Cff"Pgy” button and the next screen will pop-up as shown in Figure 4-44.
2.
Enter the MAC address of the PC (e.g. 00-11-22-33-44-AA) you’d like to control in the MAC
Address of Child PC field. Or you can choose the MAC address from the All Address in
Current LAN"drop-down list.
3. Give a description (e.g. Allow Google) for the website allowed to be accessed in the Website
Description field.
4. Enter the allowed domain name of the website, either the full name or the keywords (e.g.
google) in the Allowed Domain Name" field. Any domain name with keywords in it
(www.google.com
, www.google.com.hk) will be allowed.
5. Select from the Effective Time drop-down list the schedule (e.g. Schedule_1) you want the
entry to take effect. If there are not suitable schedules for you, click the Uejgfwng" in red
below to go to the Advance Schedule Settings page and create the schedule you need.
6. In the Status field, you can select Gpcdngf"or Fkucdngf to enable or disable your entry.
7. Click the Ucxg button.
Click the Gpcdng"Cnn button to enable all the rules in the list.
Click the Fkucdng"Cnn button to disable all the rules in the list.
Click the Fgngvg"Cnn button to delete all the entries in the table.
Click the Pgzv button to go to the next page, or click the Rtgxkqwu button return to the previous
page.