
User's Manual
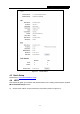
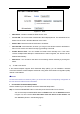
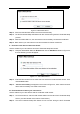
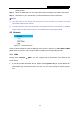
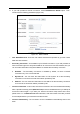

Table Of Contents
- Package Contents
- Chapter 1. Introduction
- Chapter 2. Connecting the Router
- Chapter 3. Quick Installation Guide
- Chapter 4. Configuring the Router
- Appendix A: FAQ
- Appendix B: Configuring the PC
- Appendix C: Specifications
- Appendix D: Glossary

RY/TP7231RY/TP723F " 522Odru"Yktgnguu"P"Tqwvgt"
- 19 -
Figure 4-3 Add A New Device
Uvgr"4<" Press and hold the WPS button of the client device directly.
Uvgr"5<" The Wi-Fi Protected Setup LED flashes for two minutes during the Wi-Fi Protected Setup
process.
Uvgr"6<" When the WPS LED is on, the client device has successfully connected to the Router.
Uvgr"7<" Refer back to your client device or its documentation for further instructions.
KK0" Gpvgt"vjg"enkgpv"fgxkeg‚u"RKP"qp"vjg"Tqwvgt"
Use this method if your client device has a Wi-Fi Protected Setup PIN number.
Uvgr"3<" Keep the default WPS Status as Gpcdngf and click the"Cff"Fgxkeg button in Figure 4-2,
then the following screen will appear. "
"
Figure 4-4 Add A New Device
Uvgr"4<" Enter the PIN number from the client device in the field on the above WPS screen. Then
click Eqppgev"button.
Uvgr"5<" “Eqppgev"uweeguuhwnn{” will appear on the screen of Figure 4-4, which means the client
device has successfully connected to the Route
r.
KKK0" Gpvgt"vjg"Tqwvgt‚u"RKP"qp"{qwt"enkgpv"fgxkeg"
Use this method if your client device asks for the Router’s PIN number.
Uvgr"3<" On the client device, enter the PIN number listed on the Router’s Wi-Fi Protected Setup
screen. (It is also labeled on the bottom of the Router.)
Uvgr"4<" The Wi-Fi Protected Setup LED flashes for two minutes during the Wi-Fi Protected