
User's Guide
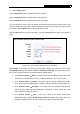
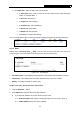
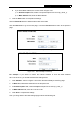
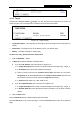
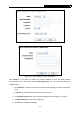
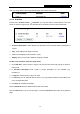
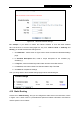
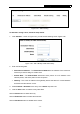
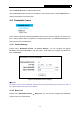
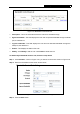
Table Of Contents
- Package Contents
- Chapter 1. Introduction
- Chapter 2. Connecting the Router
- Chapter 3. Quick Installation Guide
- Chapter 4. Configuring the Router
- Appendix A: FAQ
- Appendix B: Configuring the PC
- Appendix C: Specifications
- Appendix D: Glossary

PW-RN401/PW-RN401D 150Mbps Wireless Lite-N Router
5. Click Add New... button to add a new rule as follows:
z In Rule Name field, create a name for the rule. Note that this name should be
unique, for example Rule_1.
z In Host field, select Host_1.
z In Target field, select Target_1.
z In Schedule field, select Schedule_1.
z In Action field, select Allow.
z In Status field, select Enable.
z Click Save to complete the settings.
Then you will go back to the Access Control Rule Management page and see the following list.
4.11.2 Host
Choose menu “Access Control → Host”, you can view and set a Host list in the screen as
shown in Figure 4-49. The host list is necessary for the Access Control Rule.
Figure 4-49 Host Settings
¾
Host Description - Here displays the description of the host and this description is unique.
¾ Information - Here displays the information about the host. It can be IP or MAC.
¾ Modify - To modify or delete an existing entry.
To add a new entry, please follow the steps below.
1. Click the Add New… button.
2. In the Mode field, select IP Address or MAC Address.
z If you select IP Address, the screen shown is Figure 4-50.
1) In Host Description field, create a unique description for the host (e.g. Host_1).
2) In LAN IP Address field, enter the IP address.
- 66 -