
User's Guide
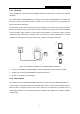
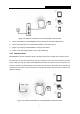
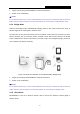
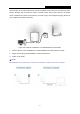
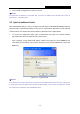
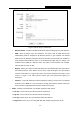
Table Of Contents
- Package Contents
- Chapter 1. Introduction
- Chapter 2. Connecting the Router
- Chapter 3. Quick Installation Guide
- Chapter 4. Configuration for AP Mode
- Chapter 5. Configuration for Router Mode
- Chapter 6. Configuration for Repeater Mode
- Chapter 7. Configuration for Bridge Mode
- Chapter 8. Configuration for Client Mode
- Appendix A: FAQ
- Appendix B: Configuring the PC
- Appendix C: Specifications
- Appendix D: Glossary

PW-RN401M
150Mbps Wireless N Nano Router
- 8 -
1. Plug the power plug of PW-RN401M in electrical wall socket.
2. Power on the notebook(s).
Note:
It is recommended that you connect a PC/notebook to the LAN port of the Router with an Ethernet
cable, and then login the Router from the PC/notebook to set the Router in AP Repeater mode.
2.3.4 Bridge Mode
Similar to the Bridge mode, PW-RN401M in Bridge mode is also used to extend the range of
wireless signal of the existing AP or wireless router.
On this mode, the only wired port works as LAN. Computer could connect to the device by either
wired or wireless way. To avoid the conflict of DHCP service with front-end devices, the DHCP
server is default to be closed on this mode. If you want to log in the management page, please set
your computer’s IP address manually.
Figure 2-4 Hardware Installation of the PW-RN401M in Bridge Mode
1. Plug the power plug of PW-RN401M in electrical wall socket.
2. Power on the notebook(s).
Note:
It is recommended that you connect a PC/notebook to the LAN port of the Router with an Ethernet
cable, and then login the Router from the PC/notebook to set the Router in Bridge mode.
2.3.5 Client Mode
PW-RN401M is used as a wireless network card to connect the wireless network signal or
wireless router.