
User's Guide
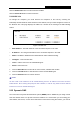
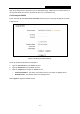
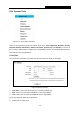
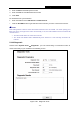
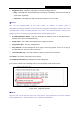
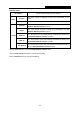
Table Of Contents
- Package Contents
- Chapter 1. Introduction
- Chapter 2. Connecting the Router
- Chapter 3. Quick Installation Guide
- Chapter 4. Configuration for AP Mode
- Chapter 5. Configuration for Router Mode
- Chapter 6. Configuration for Repeater Mode
- Chapter 7. Configuration for Bridge Mode
- Chapter 8. Configuration for Client Mode
- Appendix A: FAQ
- Appendix B: Configuring the PC
- Appendix C: Specifications
- Appendix D: Glossary

PW-RN401M
150Mbps Wireless N Nano Router
- 99 -
2. Enter the Date in Month/Day/Year format.
3. Enter the Time in Hour/Minute/Second format.
4. Click Save.
For automatic time synchronization:
1. Enter the address of the NTP Server I or NTP Server II.
2. Click the Get GMT button to get GMT time from Internet if you have connected to Internet.
Note:
This setting will be used for some time-based functions such as firewall. You must specify your
time zone once you login to the router successfully, if not, the time limited on these functions will
not take effect.
The time will be lost if the router is turned off.
The router will obtain GMT automatically from Internet if it has already connected to
Internet.
5.14.2 Diagnostic
Choose menu “System Tools
→
Diagnostic”, you can transact Ping or Traceroute function to
check connectivity of your network in the following screen.
Figure 5-55 Diagnostic Tools