
User manual


item and check PPPoE checkbox and then enter username and password. Once the setup
is completed, your NVR will automatically dial up into your network.
Step 5: Test the effectiveness of the network by clicking “Test” button after you set up the
network.
Step 6: If the network is well connected, please click “Apply” button to save the setting.
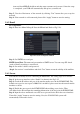
5.6.2 Email
To set up Email:
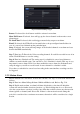
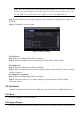
Step 1: Enter into MenuSetup NetworkEmail tab. Refer to Fig 5-24:
Fig 5-24 Network Configuration-Email
Step 2: Set SMTP Server and port.
SMTP Server/Port: The name and port number of SMTP server. You can setup SSL check
(such as Gmail) according to actual needs.
Step 3: Set sender’s address and password.
Step 4: Set receiver’s email address and click “Test” button to test the validity of the mailbox.
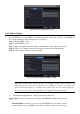
5.6.3 Server
This function is mainly used for connecting ECMS/NVMS. The setting steps are as follows:
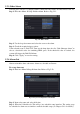
Step 1: In the server interface, select “Enable” as shown in the Fig 5-25.
Step 2: Check the IP address and port of the transfer media server in the ECMS/NVMS. The
default server port for auto report is 2009. If it is modified, please enter into the transfer media
interface to check.
Step 3: Enable the auto report in the ECMS/NVMS when adding a new device. Then
self-define device ID and input the remaining information of the device in the ECMS/NVMS.
Step 4: Input the above-mentioned server IP, server port and device ID in the server interface.
Then click “Apply” button to save the setting. Now, the ECMS/NVMS system will
automatically connect this device.