
User manual


IP-CAMERA User Manual - 14
C
C
C
h
h
h
a
a
a
p
p
p
t
t
t
e
e
e
r
r
r
5
5
5
R
R
R
e
e
e
m
m
m
o
o
o
t
t
t
e
e
e
C
C
C
o
o
o
n
n
n
f
f
f
i
i
i
g
g
g
u
u
u
r
r
r
a
a
a
t
t
t
i
i
i
o
o
o
n
n
n
5. Enable auto iris, the image mirror and image overturn function.
6. Press the "Save" button to save the settings.
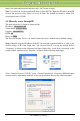
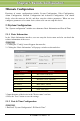
5.2.2 Video Stream
1. Enter into "Video configuration" "Video Stream" to see a interface as shown below:
2. Select the resolution of the single frame image at the "Resolution" pull down list.
3. Select the quantity of video per second at the "Frame rate" pull down list.
4. Select the data stream type at the "Bit rate type" pull down list.
5. Set the video quality at the "Video quality" pull down list.
6. Choose the alarm picture size.
7. Press the "Save" button to save the settings.
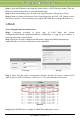
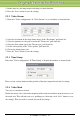
5.2.3 Time Stamp
Enter into "Video configuration""Time Stamp" to display the interface as shown below:
Here you can set date format and the position of the time stamp shown in the live image.
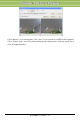
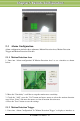
5.2.4 Video Mask
You can set 4 mask area at most.
Enable the mask, select color and transparent of the mask area and then drag the mouse to set
the mask area. This will take you see a gridding area. After that, click “Save” button to save
the settings. Then you will see a mask area on the live image.