
User's Manual


Pro Video instruments
VeCoder Ultra IP Series H264 Encoder
2
POWERING THE DEVICE. – QUICK GUDIE – FIRST MODULE IP - 192.168.1.168
a) Connect your included Power cord to the unit.
b) Once the unit is powered on insert your valid HDMI Video Signals into the HDMI port
c) Set your computer to a static IP as 192.168.1.100 ( see below on how to set your local static IP connection)
d) Connect your PC ETHERNET PORT to the VeCoder’s First Module ETHERNET PORT using a patch cord.
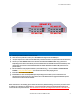
Depending on the amount of modules you have will determine the available channels and Default ip’s. We
recommend you Connect to the first Module with the default IP label of 192.168.1.168.( Please refer to
picture above)
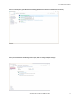
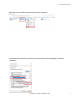
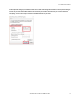
e) Run VLC VideoLan video playback software ( www.videolan.org ) On VLC > MEDIA > OPEN NETWORK
STREAM > http://192.168.1.168/0.ts. You should now see the video playing on VLC
f) Each LAN Port is used for Each Module.
g) Each Module has four channels/HDMI Inputs. Depending on the module you are connected to will
determine the Stream IP you use in VLC. Please refer to the Welcome Status page of the Module you are
connected to for the IP stream available.
NOTE: If the above is not working, please check all connections, Network Settings, and ensure your video source
is working. You could also try with another pc, or reset the VeCoder unit by pressing the Reset button for 20
seconds on the rear panel of the unit. This will default the modules IP settings back to default of 192.168.1.168.