
User Manual

Pro Video Instruments
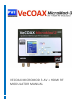
VeCOAX MicroMod 3 AV + HDMI RF Modulator Manual
4
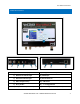
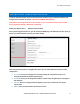
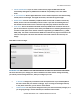
STATUS INDICATOR LIGHTS
BLUE ON-AIR LED
RED POWER LED
SOLID
RF SIGNAL
BROADCASTING
SOLID
POWERED ON
OFF
NO BROADCASTING
OFF
NO POWER
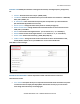
QUICK SETUP GUIDE WITH DEFAULT SETTINGS – USA/CANADA
It is recommended to test the device first on a test bench for your application before making it a
permanent installation to your system so troubleshooting is easier. By default, the unit is set to QAM
(J.83B) Mode with a Frequency of 783.000 MHz which is physical channel 122. Channel numbers are
Major 1, Minor 1. The TV will pick up the channel on Cable channel 1.1 and display our PVI logo when
no HDMI is connected.
1. Connect your included Power adapter into the unit. After a few seconds, the Power LED and
On-Air LED will both be steady lit.
2. Connect a short piece of coax cable to your TV’s RF In and the other end to the unit’s RF Out.
3. Auto Scan for Channels on your TV. If prompted for signal type, select Digital Cable.
4. Once the scan is complete, tune to the Channel found on your TV. You should see a PVI test
pattern screen.
5. Connect your HDMI source cable. Please ensure that your HDMI source, such as a DVD player,
is set to a Fixed Resolution of 1080P or 720P.
6. Once you have inserted a valid HDMI Video Signal into the HDMI port, the On-Air LED will turn
off then turn back on.
7. After a few seconds, you should see the video playing on your Channel.
To configure the unit beyond the default settings, see the WEB INTERFACE CONFIGURATION GUIDE
on Page 6 for web interface setup, or see the ON-BOARD DISPLAY on Page 10 to use the on-board
menu.