
User Manual


Pro Video Instruments
VeCOAX MicroMod 3 AV + HDMI RF Modulator Manual
17
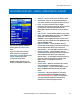
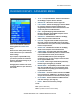
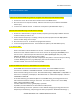
ADVANCED MENU – IP SETTINGS
These are the Defaults and Good
starting point for PLUG N PLAY
setup.
Access this menu by going to
Settings -> Advanced -> IP Settings.
• DHCP – Allows IP address of unit to be set
automatically by your network. Disabled by default.
• IP ADDRESS – Set the IP Address for the Web
Interface of the unit. Default is 192.168.0.136.
• NETMASK – Set the Subnet Mask, default is
255.255.255.0.
• GATEWAY – Set the Default Gateway, default is
192.168.0.1.
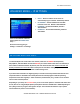
INSTALLING MULTIPLE UNITS
To install multiple units on the same coax network, make sure to CHANGE the Frequencies,
Major/Minor, and Short Name of each unit BEFORE you connect them to the same coax network, so
there will be no Channel Conflicts. By default, each unit will be set the same. Please Test each unit
directly connected to a Test TV first with a short piece of coax before making it a permanent
installation such as a rack mount to make troubleshooting easier.
If you have other modulators or Digital signals you must find a harmony between the RF levels and
Frequencies that are available such as ATSC (Over the Air Antenna) signal. Check the operating
frequencies of the other signals (i.e. other modulators, OTA channels, etc.), and be sure to set these
units to other valid frequencies.
Depending on your setup we recommend for you to use an active splitter or combiner with more than
6 units, 40+ TVs or using multiple splitters (each splitter will lower the DB level 5-10dbs depending on
the quality) to ensure you get a clear signal to all your TVs no matter the distance. If your system
works without one, then it is not necessary.