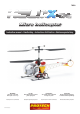
T0509 Micro helicopter Instruction manual • Handleiding • Instructions d'utilisation • Bedienungsanleitung WARNING ! This radio controlled helicopter is not a toy. LET OP ! Dit radiobestuurd model is geen speelgoed. ATTENTION ! Ce modèle radiocommandé n’est pas un jouet. ACHTUNG ! Dieser ferngesteuerte Hubschrauber ist kein Spielzeug.
Introduction / Inleiding / Introduction / Vorwort GB READ THIS FIRST! This helicopter is 100% ready to fly. It has been factory tested and trimmed to fly as soon as the batteries are ready. This manual is an overview of the construction and operation of this R/C helicopter to be used as a reference. INTRODUCTION The HELIXX is a truly Ready-for-Anyone-to-fly micro helicopter.
Introduction / Inleiding / Introduction / Vorwort - - - van de rotorbladen loskomen, worden ongecontroleerde projectielen en de helikopter wordt zo onstabiel en volkomen stuurloos. Storingen in de zenderbesturing, veroorzaakt door bvb. vreemde voorwerpen, uitvallen van een onderdeel of door lege of defecte batterijen, maken de helikopter plots onberekenbaar: hij zal zich zonder waarschuwing vooraf in gelijk welke richting voortbewegen.
Introduction / Inleiding / Introduction / Vorwort EXCLUSION DE RESPONSABILITÉ/DÉDOMMAGEMENTS Le respect des instructions de montage et d’utilisation ainsi que les conditions d’installation, de fonctionnement et d’entretien de ce modèle et de tous les éléments utilisés pour son équipement ne peuvent pas être surveillés par la Firme PROTECH.
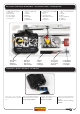
Kit content / Inhoud van de bouwdoos / Contenu de la boîte / Packungsinhalt 1. 100% Prebuilt chassis 2. Transmitter 3. Battery pack 4. Li-po charger 5. Power supply 6. Instructions - Transmitter Zender Emetteur Fernlenkset 1. Châssis prémonté à100% 2. Emetteur 3. Accu 4. Chargeur Li-po 5. Alimentation pour le chargeur 6. Instructions 1. 100% voorgebouwd chassis 2. Zender 3. Batterij 4. LiPo lader 5. Voeding 6.
Disassembling the canopy / Demonteren van de romp / Démonter le fuselage / Rumpf auseinander nehmen To remove the fuselage: Remove the 2 screws of the cabine. Remove the 4 screws of the landing skids and separate the mechanism and the fuselage. Om de romp te demonteren: Verwijder de 2 schroeven van de kabine. Verwijder de 4 schroeven van het landinggestel en verwijder de romp van het mechanisme. Pour démonter le fuselage: Dévissez les 2 vis de la cabine. Dévissez les 4 vis des pâtins d'atterrissage.
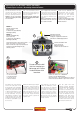
Electronic components / Elektronische installatie / Composants électroniques / Elektronische Ausstattungen Elevator servo Aileron servo Electronics equipment is installed at the factory. Please check these components to ensure that they are installed snugly as some shifting may have occured in shipping. 4 in 1controller Alle electronika is voorgemonteerd. Controleer of alle componenten goed vastzitten en niet verschoven zijn tijdens het transport.
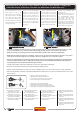
Charging and installing the battery / Laden en montage van de batterij/ Chargement et installation de l’accu / Laden des Akkus WARNING: Do not leave battery unattented while charging! OPGELET: Laadt de batterij nooit zonder toezicht! ATTENTION: Ne pas laisser l’accu sans surveillance pendant la charge ! ACHTUNG: Akkus dürfen nur unter Aufsicht geladen werden! Connect the 230V power supply Sluit de 220V voeding aan op de to the Li-Po charger. Connect the Li-Po lader.
Operating for the first time / Eerste aansluiting Première prise en main / Erstmalige Inbetriebnahme Test the electronics to be sure operate properly. The helicopter must now be “trimmed” or fine tuned for optimal performance. ALWAYS turn the transmitter “ON” before plugging the battery into the Helixx. Test of de electronika correct functioneert. De helicopter moet nu nog een fijafstelling krijgen voor de beste resultaten. Zet altijd eerst de zender aan alvorens de batterij in de Helixx aan te sluiten.
Adjusting aileron and elevator control / Aileron en elevator controle bijstellen / Réglage des commandes Aileron et Elévateur / Einstellen von Höhenruder und Querruder servo The two mounted servos on the Helixx control the response. An aileron input from the transmitter will cause the Helixx to tilt either left or right. The elevator control causes the Helixx to tilt forward or back. Fine tuning these controls will cause the Helixx to tilt left to right and forward naturally.
Control the Helixx / Helixx controle / Commandes & mouvements / Steuerung des Helixx • WARNING: This section covers R/C helicopter movement. If your helicopter is ON when you move these controls the motor may turn unexpectedly! Do not move the sticks on the transmitter while the helicopter is ON unless you are sure the model is working properly and you are ready to fly or make adjustments safely. • OPGEPAST: Deze stap legt de beweging uit van de helicopter.
Control the Helixx / Helixx controle Commandes & mouvements / Steuerung des Helixx MODE 2 MODE 1 1 1 • • • • 2 2 Aileron controls the helicopter’s left and right tilt. Be careful! Too much aileron can cause the Helixx to tip too far. Aileron controle beweegt de helicopter links en rechts. Voorzichtig! Teveel input laat de helicopter te veel bewegen. La commande d’aileron incline le modèle vers la gauche ou la droite. Attention: Trop d’aileron peut faire incliner l’hélicoptère trop loin.
Learn to fly / Vlieglessen / Apprendre à voler / Lernen zu fliegen MODE 1 / MODE 2 Left stick Right stick MODE 2 MODE 1 2 meters Place the Helixx on the ground and stand behind the model. Keep elbows down and stand about 2 meters from the model. Slowly increase the throttle until the Helixx seems to begin lifting upwards. Focus on the nose while keeping the tail facing towards you. Ga achter het model staan. Voor het vliegen moet je op de neus van het model letten en niet op de achterzijde.
Learn to fly / Vlieglessen / Apprendre à voler / Lernen zu Fliegen Move slowlly downward Beweeg traag naar beneden Descendez lentement le stick Practice landing the helicopter. Note that the helicopter will drop rapidly if the throttle stick is moved too fast so do so gradually. Hard landings can damage the helicopter Oefen de landing: Wanneer de gas stick te snel naar beneden bewogen wordt, zal de helicopter te snel/hard neerkomen. Beweeg de gas stick voorzichtig.
Learn to fly / Vlieglessen / Apprendre à voler / Lernen zu Fliegen MODE 2 MODE 1 While in mid-air try using the aileron and elevator controls to move the helicopter forwards, backwards and side to side while maintaining the same elevation. Only slight inputs are needed to move the helicopter. Probeer om de Helixx voorwaarts en achterwaarts en links en rechts te bewegen tijdens de vlucht. De benodigde stick inputs zijn zeer klein.
SPARE PARTS T0508.001 Main frame T0509.002 Battery support T0508.003 Main blade T0508.004 Flybar set T0509.005 Landing skid T0508.006 Out shaft & gear set T0508.007 Inner shaft T0508.008 Gear & shaft set T0508.009 Swashplate set T0508.010 Rotor head T0508.011 Main blade grip set T0508.012 Shaft retaining T0508.013 Ball bearing 4x8x3mm T0508.014 Ball bearing 2x6x3mm T0508.015 Servo pushrod T0508.016 Screw bag T0508.017 Tool package T0508.018 Main motor (2pcs) T0509.
SPARE PARTS T0508.024 4CH Transmitter T0508.025 Lipo matic charger T0508.
Declaration of conformity EC-R&TTE Product: HELIXX helicopter with 4CH radio transmitter AVENGER Intended Purpose: On request Radio equipment for remote controlling of models Equipment class: 2 Complies with the essential requirements of chapter 3 and the other relevant provisions of the FTEG (Article 3 of the R&TTE directive), when used for its intended purpose Harmonised standards applied Olen, 20 Augustus 2006 Stefan Engelen CEO PROTECH is a registered trademark of PRO MODELS BVBA - GEEL
Frequency Bands / Frequentie Banden / Bandes de Fréquences / Frequenzbänder Frequency Frequentie Bandes Frequenz Channel Kanaal Nr Canaux Kanal Nr Frequency Frequentie Fréquences Frequenz Admitted in following countries Toegelaten in volgende landen Admis dans les pays suivants Zugelassen in nachfolgende Ländern D B A DK F I L N NL S CH 35 MHz-Band K61 35.010 # # # # # # # # # K62 35.020 # # # # # # # # # K63 35.
PRECAUTIONS / VEILIGHEIDSVOORSCHRIFTEN ALWAYS: • Take out an insurance policy for RC models • Check frequencies of other pilots • Make sure that no people or obstructions are in the flight area • Check if transmitter and powerpack are fully charged • Inspect helicopter for loose or damaged parts • Turn ON the transmitter first and then the model • Perform range check (see transmitter instruction manual) AFTER THE FLIGHT • Disconnect the powerpack • Turn OFF the model first and then the transmitter • Ch
PRECAUTIONS / VORSICHTSMAßNAHMEN TOUJOURS: • Prendre une police d’assurance pour l’utilisation de modèles réduits RC • Vérifier que d’autres pilotes n’utilisent pas la même fréquence • Assurez-vous qu’il n’y a pas de personnes ou d’obstacles sur le terrain de vol • Vérifier que tous les accus sont en pleine charge • Vérifier qu’il n’y a pas de pièces manquantes ou abîmées • Allumer toujours l’émetteur en premier et ensuite le modèle • Tester la portée de l’émetteur (voir manuel de l’émetteur) APRÈS LE VO
SAFETY INFORMATION and HANDLING PRECAUTIONS for lipo battery Introduction: Modern Lithium Polymer batteries (LiPo, Li-Poly) are a preferred source of power for flying models because of their ability to store and deliver large amounts of energy from light-weight packs. Performance wise, these new batteries have much more in common with model aircraft fuel than with any previous battery technology and they deserve similar respect: For safe handling it is useful to Think of Lithium Polymer Batteries as Fuel.
SAFETY INFORMATION and HANDLING PRECAUTIONS for lipo battery To actively prevent a fire: Lithum Polymer Do’s Do Always use a correctly specified Lithium Polymer charger [mandatory] Do Always double-check that your multi-function charger is set in LiPo mode [extremely important] Do ensure that your charger has a clean power supply such as a car battery that is not itself on charge Do Always set the charger to the total series cell count “s” of your pack (or packs if charging in series) Do read the battery la
VEILIGHEIDS en GEBRUIKSVOORSCHRIFTEN voor Li-Po batterijen Inleiding: De moderne Lithium Polymeer (LiPo of Li-Poly) zijn de energiebronnen bij uitstek voor vliegende modellen vanwege hun lage gewicht en hoge energiedensiteit. Deze nieuwe batterijen hebben meer gemeen met brandstof dan met oude batterijtechnologie op gebied van vermogen. Ook qua veiligheid hebben deze batterijen meer overeenkomsten met brandstof. Voor veilig gebruik is het best om Lithium Polymeer batterijen te behandelen als brandstof.
VEILIGHEIDS en GEBRUIKSVOORSCHRIFTEN voor Li-Po batterijen Veiligheidsvoorschriften: Met Lithium Polymeer altijd: Altijd een correcte lader gebruiken die ontworpen is voor Li-Po (verplicht). Altijd nakijken dat de multifunctionele lader in Li-Po modus werkt alvorens te laden (zeer belangrijk). Altijd een gestabiliseerde voeding gebruiken om je lader te voeden (geen autobatterij). Altijd het correcte aantal cellen in serie ‘s’ van je batterij ingeven in de lader.
INFORMATIONS et PRECAUTIONS D’USAGE des accus Li-Po Introduction: Les accus Lithium Polymère (LiPo, Li-Poly) sont la source d’énergie préférée pour les modèles volants grâce à leur capacité à stocker et à délivrer une grande énergie dans un pack très léger. Avec ces nouveaux accus, les avions électriques ont bien plus que de sages performances, ils peuvent enfin réellement rivaliser les autres avions à motorisation thermique. Par sécurité pensez accus Lithium Polymère comme si s’était du carburant.
INFORMATIONS et PRECAUTIONS D’USAGE des accus Li-Po Afin de prévenir un risque d’incendie: Vous devez faire Utilisez OBLIGATOIREMENT un chargeur spécifique pour Lithium Polymère Contrôlez toujours 2 fois si tous les réglages sont en mode LiPo (Très important) Assurez-vous que le chargeur est connecté à une alimentation suffisante comme une batterie de voiture mais que celle-ci ne soit pas elle-même en charge en même temps.
SICHERHEITSINFORMATIONEN und BENUTZUNGSVORKEHRUNGEN für LiPo Akkus Einleitung: Modere Lithium Polymer Akkus (LiPO, Li-Poly) sind die bevorzugte Stromquelle für Flugmodelle aufgrund ihrer Eigenschaft große Mengen Energie bei leichtem Gewicht speichern zu können. Im Verhalten ähneln dies neuen Akkus viel mehr einem Flugkraftstoff als alle Akkus vorher und müssen mit der selben Vorsicht behandelt werden: Um einen sicheren Gebrauch zu gewährleisten sollten Lithium Polymer Akkus als Kraftstoff betrachtet werden.
SICHERHEITSINFORMATIONEN und BENUTZUNGSVORKEHRUNGEN für LiPo Akkus 1C=3,2A für ein 3200mAh Pack, 0,83A für ein 830mAh Pack und so weiter. Wählen Sie einen entsprechenden Lademodus bei oder unterhalb 1C aus. Laden Sie nicht ungleiche oder unpassende Akkupacks in Serie oder mit verschiedenen Zellentypen, Zellenkapazitäten, Packkapazitäten oder Ladestatus (+/- 0,03V pro Zelle). Im Zweifel immer getrennt laden. Lassen Sie es nicht zu, daß Ihr Akkupack unter 3,0v PRO Zelle entladen wird.
Other models available / Andere beschikbare modellen Autres modèles disponibles / Andere Modelle verfügbar 30 •
NOTES • 31
Visit our website www.protech.be AM 06 09:41 09/04/20 PROTECH ion - Heli Divis M KET ZOO 3D micro THE POC smallest ld’s The wor r. helicopte h cal Protec t your lo e parts visi your spar der d fin For spare t n’ you ca please or dealer. If l dealer, your loca parts at here. is ET ZOOM The POCK any micro an th r le smal r yet it helicopte a full features ead , e rotorh d a collectiv en tail an belt driv rol PM cont 120° CC system.