CORE BALANCE DISC Instruction Manual & Exercise Guide
Disclaimer, Terms and Conditions IMPORTANT Please read this entire manual before using the ProsurceFit Core Balance Disc. Failure to follow these instructions can lead to significant injury and/or property damage. ProsourceFit recommends that you always obtain a complete physical examination before beginning any exercise program. If you experience any discomfort while using the Core Balance Disc discontinue use & consult your physician.
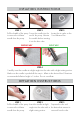
I N F L AT I O N I N S T R U C T I O N S STEP 3 STEP 2 STEP 1 Pull the handle of the pump Screw the needle into the Locate the air valve on the end of the pump. Moisten Core Balance Disc. to remove the inflation the needle before inserting needle from the pump. it into the disc valve. WRONG WAY RIGHT WAY STEP 4 Carefully insert the needle at a slight angle into the valve with a slight twisting motion. Make sure the needle is pushed all the way in. Inflate to the desired level.
EXERCISE GUIDE CORE ROTATION Level 1: 1. Kneel down on the balance disc with body straight (forming a 90 degree angle at the knees), toes lightly touching the floor. 2. Keeping your body tall and chest lifted, with core and glutes tight, cross your arms in front of your chest. 3. Rotate your torso and head slowly to the left as far as you can while maintaining a straight back. 4. Return to the start position, then rotate to your right side. 5. Repeat 10-15 times on each side.
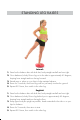
STANDING LEG RAISES Lateral: 1. Stand on the balance disc with both feet, body straight and tall and core tight. 2. Once balanced, slowly lift one leg out to the side to approximately 45 degrees, keeping knee straight and toes facing forward. 3. Extend arms or place on your hips to help maintain balance. 4. Pause for 2 seconds, then lower leg until toe just barely touches the ground. 5. Repeat 8-10 times, then switch to the other leg. Sagittal: 1.
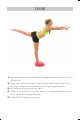
T-POSE 1. Step onto the balance disc with the other leg slightly bent in front of you so it’s off of the ground. 2. Tighten core, then slowly hinge forward at the hip and reach your arms out in front of you, simultaneously extending your other leg straight behind you. 3. Your body should now resemble the letter T. 4. Hold for 5 seconds, then slowly lower back to your starting position and repeat on one leg before switching to the other. 5. Complete 8-10 repetition on each leg.
BICEP CURL TO SHOULDER PRESS Level 1: 1. Hold a dumbbell in each hand and carefully step onto the balance disc. Keep 2. your core tight, back straight and chest lifted. 3. Curl: Once stabilized, turn palms out and perform a bicep curl by flexing and bending at the elbow, bringing weights toward your shoulders. 4. Keep elbows by your side the entire time. 5. Press: Rotate arms so palms are facing out, then press weights overhead until arms are almost straight. 6.
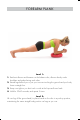
FOREARM PLANK Level 1: 1. Rest bent elbows and forearms on the balance disc, elbows directly under shoulders and palms facing each other. 2. Extend legs behind you so just your toes are touching the ground and your body forms a straight line. 3. Keep core tight so you don’t arch or sink at the hips and lower back. 4. Hold for 30-60 seconds, and repeat 3 times.
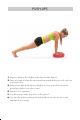
PUSH-UPS 1. Align two balance discs slightly wider than shoulder distance. 2. Place one hand on each disc and extend legs straight behind you with only toes touching the floor. 3. Keeping core tight and body in a straight line, lower yourself as close to the ground as possible, then return to start. 4. Perform 10-15 repetitions. 5. To make push-up easier, drop knees to the ground. 6. You may also perform push-ups with both hands on one disc for more of an emphasis on your triceps.
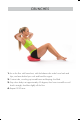
CRUNCHES 1. Lie on the floor with knees bent, with the balance disc under lower back and hips, and arms behind your neck and head for support. 2. Contract abs, crunching up toward knees and keeping chin lifted. 3. Stop when body is at approximately 45 degrees, then lower toward floor until back is straight, shoulders slightly off the floor. 4. Repeat 15-20 times.
BRIDGE Level 1: 1. Lie on your back with your knees bent and set your feet on top of the balance disc so heelsare underneath knees. 2. Extend arms out at your sides, resting on the floor. 3. Press up through your heel, raising hips toward the ceiling and flexing glutes. 4. Hold for 2-3 seconds, then slowly lower hips back to the ground. 5. Repeat 10 -15 times. Level 2: 1. Place one foot flat on the balance disc with heel under your knee.
SQUATS 1. Step onto the balance disc with both feet and brace your core for balance. 2. Once stabilized, slowly bend your knees and waist to perform a squat. 3. Continue squatting until your knees are bent to approximately 90 degrees, and stand back up. 4. Perform as many squats as possible maintaining even balance and good form 5. You can also do this with two balance discs about shoulder distance apart, standing with one foot on each.
V-HOLD 1. Sit on the center of the disc, knees bent with heels on the ground, and extend arms out to your sides. 2. Slowly lift one leg up off the ground. 3. Once stable, lift the other leg up until both are approximately 90 degress. 4. Hold in this postion as long as you can, up to 30 seconds.
SCISSOR AB HOLD 1. Sit on the center of the disc, legs straight with heels on the ground feet pointed. 2. Extend arms out to the side. 3. Slowly lift one leg off the ground as high as you can above the hip. 4. Once stable, lift the other leg up hip level while keeping back straight and core tight. 5. Hold in this position as long as you can, up to 30 seconds. 6.
WARNING: Do not use this product in ways not intended by its manufacturers. Failure to do so may result in severe injury or death. Consult your physician before engaging in any regular exercise. Do not use ProsourceFit products for anything other than their intended use. ProsourceFit is not responsible for any problems that arise from the misuse of this product. LIMITED LIFETIME WARRANTY Covers manufacturing defects including any defects in materials and workmanship.
Train like a Pro, Train with ProsourceFit!