THERAPY FLAT RESISTANCE BANDS SET Instruction Manual & Exercise Guide
Disclaimer, Terms and Conditions IMPORTANT Please read this entire manual before using the ProsurceFit Therapy Flat Resistance Bands Set. Failure to follow these instructions can lead to significant injury and/or property damage. ProsourceFit recommends that you always obtain a complete physical examination before beginning any exercise program. If you experience any discomfort while using the ProsourceFit Therapy Flat Resistance Bands Set, discontinue use & consult your physician.
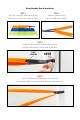
Door Anchor Use Instructions STEP 1 Slip one end of the band through the loop portion of the door anchor piece. STEP 2 Slide the anchor piece to the middle of the band. STEP 3 Open the door and insert the anchor portion with the ball inside the hinge side of the door. LOOP PORTION ANCHOR PORTION STEP 4 Once it is all the way behind the door with the loop portion still in front of the door, close the door securely.
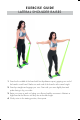
EXERCISE GUIDE LATERAL SHOULDER RAISES 1 Stand on the middle of the band with feet hip-distance apart, gripping one end of the band in each hand. Make sure each end of the band is at the same height. 2. Stand up straight and engage your core. Start with your arms slightly bent and palms facing in by your sides. 3. Raise your arms up and out, letting your elbows lead the movement. Maintain a slight bend at the elbows until they are at shoulder height. 4. Slowly return to the starting position, then repeat.
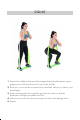
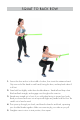
SQUAT 1 Stand on the middle of the band with feet approximately shoulder-distance apart, gripping one end of the band over the top of each shoulder. 2. Brace your core to start the movement. Keep chest lifted, elbows up, head up, and back straight. 3. Bend your knees and lower toward the ground as you push your buttocks backward, until thighs are parallel to the floor. 4. Pause for one second, then press up through your heels to the starting position. 5. Repeat.
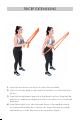
TRICEP EXTENSIONS 1. Secure the door anchor near the top of a door, then insert band. 2. Grip one end of the band in each hand, then step back 3 to 4 feet away from the door. 3. Stand with feet hip-distance apart with a slight bend in the knee. Keep back flat and chest up, and bend just slightly at the hips. Draw elbows in to your side and bend arms. 4. Keep elbows tight by your sides with palms facing in, then straighten arms as you press band toward the floor.
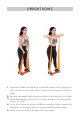
UPRIGHT ROWS 1. Stand on the middle of the band with feet shoulder-distance apart, gripping one end of the band in each hand. Make sure each end of the band is at the same height. 2. Start with arms straight & palms facing toward your body at the front of your thighs. 3. Pull the band straight up the front of your body to shoulder level, keeping hands close to your body. 4. As you do this, bend your elbows and lift them toward the ceiling, keeping them higher than your shoulders.
PULL APARTS 1. Hold the band in front of you, with hands at shoulder height and distance, palms facing down. 2. Stand with knees slightly bent and feet shoulder-distance apart. Keeping your arms straight, pull the band apart and back, bringing the band to your chest. 3. Slowly return to start position, keeping arms straight, then repeat.
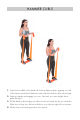
HAMMER CURLS 1. Stand on the middle of the band with feet hip distance apart, gripping one end of the band in each hand. Make sure each end of the band is at the same height. 2. Stand up straight and engage your core. Start with your arms straight down, palms facing in. 3. Pull the band up by bending your elbows until your hands are by your shoulders. Make sure to keep your elbows tucked into your sides throughout the movement. 4. Slowly return to the starting position, then repeat.
SQUAT TO BACK ROW 1. Secure the door anchor in the middle of a door, then insert the resistance band. Grip one end of the band in each hand, facing the door, and step back about 3 to 4 feet. 2. Stand with feet slightly wider than shoulder-distance. Stand tall and keep chest lifted and back straight, and engage core throughout the exercise. 3. Extend arms straight out in front of you with palms facing in toward your body. Bend your knees and lower into a squat until thighs are parallel with the floor.
CHEST PRESS 1. Secure the door anchor near the middle of a door, then insert band. 2. Grip one end of the band in each hand, and stand 3 to 4 feet away from the door in a staggered stance with your back to the door. Position your arms so that they are bent at a 90-degree angle, parallel with the floor. Elbows should be even with your shoulders and palms should be facing down. 3. Draw your shoulder blades together and down, keep your back straight and head up, and engage your core throughout the exercise.
KNEELING CRUNCH 1. Secure the door anchor near the top of a door, then insert the resistance band. 2. Grip one end of the band in each hand, making sure they are even, then kneel down about two feet away from the door. 3. Pull the band in toward your ears and extend elbows out at shoulder-height. Engage your abdominals, then bend at the hips as you draw your elbows toward your knees and contract your abs. 4. Do not move your arms or hands throughout the movement.
RESISTED PUSH-UP 1. Begin in a push-up position on hands and toes, with hands slightly wider than shoulder distance. The ends of the band should be under each hand, with the band across your upper back. 2. Maintain a neutral spine throughout the exercise and keep core engaged. 3. Bend your arms to lower your chest to the floor, then press back up to the starting position. 4. Repeat.
DONKEY KICKS 1. Kneel down on the floor and place the middle of the band around the bottom of one foot. Grip one end of the band in each hand, and position yourself on all fours, with wrists under shoulders and knees under hips. Maintain a neutral spine and engaged core throughout the exercise. 2. Keeping your foot flexed, press the band back and slightly upwards with your leg until leg is straight and parallel with the floor. 3.
WARNING: Do not use this product in ways not intended by its manufacturers. Failure to do so may result in severe injury or death. Consult your physician before engaging in any regular exercise. Do not use ProsourceFit products for anything other than their intended use. ProsourceFit is not responsible for any problems that arise from the misuse of this product. LIMITED LIFETIME WARRANTY Covers manufacturing defects including any defects in materials and workmanship.
Train like a Pro, Train with ProsourceFit!