
Instructions / Assembly

Page 24 of 25
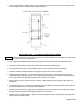
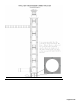
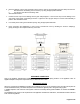
6. Place the flashing over the liner and position down onto the chimney top and tighten the gear clamp onto the liner.
i. Seal and anchor the flashing onto the chimney top using the appropriate materials.
ii. Trim the liner just above the flashing collar.
See illustrations below.
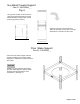
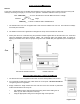
7. Position the rain cap over the flashing with the gear clamps aligned. Lower the rain cap over the flashing so the
gear clamp screw heads of both fittings interlock. Tighten the rain cap gear clamp to lock the entire assembly in
position. See illustrations below.
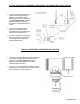
8. If necessary finish closing off the breach opening using the appropriate materials.
9. Finish connecting the appliance(s) to the Z-Vent™ Smoothcore liner by installing the Z-Vent™ adaptor(s),
pipe(s) & fittings to the completed chimney connection.
APPLIANCE CONNECTION
Refer to the appliance manufacturer's installation manual for proper method of joining Z-VENT to the appliance collar. An
appliance adapter to suit specific requirements may be obtained from Z-FLEX.
IMPORTANT NOTICE
When any of the previous installation procedures are completed, be sure to go over the entire system to make sure all joints are
secure and sealed correctly. The seams and joints must be checked for tightness prior to using the venting system.
A qualified inspector must check the entire system at least once annually following initial installation to maintain the Z-FLEX
warranty.
The installation must conform to the requirements of the appliance manufacturers' instructions, The National Fuel Gas Code and
local codes and regulations.