
Installation Manual
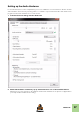


Table Of Contents
- Table of Contents
- Introduction
- Installation
- Requirements
- About the Audio Hardware
- About MIDI Interfaces
- Installing the Software
- Upgrading from an earlier Reason version
- Running the Installer
- The Authorization system
- Registering and authorizing Reason
- About deauthorizing the computer
- Running Reason on an authorized computer - or with an Ignition Key hardware
- Running Reason with Internet Verification
- Running Reason in Demo Mode
- Using Reason with ReWire on a 64-bit operating system
- Setting Up

SETTING UP
33
Master Keyboard Input
This allows you to set a preference for how Master Keyboard Input mode is selected:
• Standard mode
This always sets Master Keyboard Input to the selected track.
• Separated mode
This will allow you to independently select tracks while Master Keyboard Input is unchanged. When
this is mode is active, Master Keyboard Input is set by clicking the device icon in the track list. Select-
ing another track (by clicking on the track name or somewhere in the track list), leaves Master Key-
board Input unchanged.
Other functions
D To edit a surface, double-click it in the list (or select it and click Edit).
This lets you change its name and MIDI port settings, if needed.
D To delete a surface, select it in the list and click Delete.
D You can turn off a surface by deactivating its “Use with Reason“ checkbox.
This could be useful if the surface is connected to your system but you only want to use it with another
program, etc.
• There is also an “Advanced” page in the Preferences.
This is only used for External Control MIDI buses and for MIDI Clock Sync. All hands-on MIDI control is
set up on the Control surfaces page.