
Installation Manual


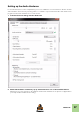


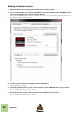
Table Of Contents
- Table of Contents
- Introduction
- Installation
- Requirements
- About the Audio Hardware
- About MIDI Interfaces
- Installing the Software
- Upgrading from an earlier Reason version
- Running the Installer
- The Authorization system
- Registering and authorizing Reason
- About deauthorizing the computer
- Running Reason on an authorized computer - or with an Ignition Key hardware
- Running Reason with Internet Verification
- Running Reason in Demo Mode
- Using Reason with ReWire on a 64-bit operating system
- Setting Up

SETTING UP
30
Adding a Control surface
1. Open the Preferences dialog and click the Control surfaces tab.
2. If your control surface is connected via USB (or if you have made a two-way MIDI connec-
tion), try clicking the Auto-detect Surfaces button.
Reason scans all MIDI ports and tries to identify the connected control surfaces. Note that not all con-
trol surfaces support auto-detection.
All found surfaces are listed in the Attached Surfaces list.
3. To add a control surface manually, click the Add button.
This brings up a new dialog.
4. Select the manufacturer of your control surface from the Manufacturer pop-up menu.
If you can't find it on the menu, see below.
5. Select the model of your control surface from the Model pop-up menu.
If you can't find it on the menu, see below.