
Getting Started Guide


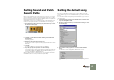
Table Of Contents

SETTING UP
17
Setting Sound and Patch
Search Paths
Reason songs and patches can contain references to other files on your hard
disk, such as samples. To keep track of all files, Reason makes use of a “data-
base”. If you keep your Reason files within the database, Reason can update file
paths, automatically search for missing files, etc.
This database consists of up to four different folders on disk (and all their sub-
folders). You specify which folders to use as database in the following way:
1. In the Preferences dialog, use the pop-up menu at the top to select
the Sound Locations page.
2. Click the “1” folder button below the heading “Sound and Patch
Search Paths”.
A file dialog appears.
3. Navigate to the desired folder and select it.
You can select a folder on any drive (including mapped network drives under
Windows).
4. Click OK.
The folder is added as the first search path in the database.
5. If you like, specify search path 2 to 4 in the same way.
It is normally enough to specify a single path, since all underlying folders are
automatically included in the database. Use the additional paths if you use
more than one hard drive, CD-ROM drives etc.
When you add sound files or save Reason files, you should place them within
the database (under one of the specified search path folders).
Setting the default song
Every time you start Reason, and every time you select “New” from the File
menu, a default song opens. The “standard” default song contains a few select
devices.
You can however decide exactly what you want the default song to look like, in
the following way:
1. Open the Preferences dialog from the Edit menu (or Reason menu
if you are running Mac OS X).
2. Use the pop-up menu at the top of the Preferences dialog to select
the General page.
3. At the middle of this page, there is a section entitled “Default
Song”.
You have three choices: “Empty Rack”, Built In” and “Custom”.
Select which one you want to use by clicking the corresponding radio but-
ton.