
11.0


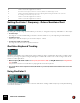
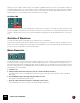
Table Of Contents
- Table of Contents
- Introduction
- Overview
- Audio and MIDI Basics
- Using Reason Rack Plugin as an Instrument
- Using Reason Rack Plugin as an Effect
- Working in the Rack
- Routing Audio and CV
- Sounds, Patches and the Browser
- The I/O device
- Kong Drum Designer
- Introduction
- Overview
- About file formats
- Using patches
- Pad Settings
- The Drum and FX section
- The Drum modules
- The Support Generator modules
- The FX modules
- Connections
- Using Kong as an effect device
- Using external effects with Kong
- Redrum Drum Computer
- Introduction
- About file formats
- Using patches
- Programming patterns
- Redrum parameters
- Using Redrum as a sound module
- Connections
- Dr. Octo Rex Loop Player
- Introduction
- About REX file formats
- Loading and saving Dr. Octo Rex patches
- Playing Loops
- Adding Loops
- Playing individual Loop Slices
- Slice handling
- Dr. Octo Rex panel parameters
- Dr. Octo Rex synth parameters
- Connections
- Europa Shapeshifting Synthesizer
- Introduction
- Panel overview
- Signal flow
- Playing and using Europa
- Panel reference
- Sound Engines On/Off and Edit Focus section
- The Oscillator section
- The Modifiers section
- The Spectral Filter
- The Harmonics section
- The Unison section
- The User Wave and Mixer section
- The Filter section
- The Amplifier section
- The Envelopes section
- Envelope 1, 2, 3 and 4
- Preset
- Adding a Sustain stage
- Adding and removing envelope points
- Changing the envelope curve shape
- Looping the envelope
- Editing levels only
- Creating “free form” envelope curves
- Using the Envelope 3 and Envelope 4 curves as Sound Engine waveforms
- Using the Envelope 4 curve as a Spectral Filter curve
- The LFO section
- The Effects section
- The Modulation Bus section
- Connections
- Tips and Tricks
- Grain Sample Manipulator
- Thor Polysonic Synthesizer
- Subtractor Synthesizer
- Malström Synthesizer
- Monotone Bass Synthesizer
- ID8 Instrument Device
- Rytmik Drum Machine
- Radical Piano
- Klang Tuned Percussion
- Pangea World Instruments
- Humana Vocal Ensemble
- NN-XT Sampler
- Introduction
- Panel overview
- Loading complete Patches and REX files
- Using the main panel
- Overview of the Remote Editor panel
- About Samples and Zones
- Selections and Edit Focus
- Adjusting parameters
- Managing Zones and Samples
- Working with Grouping
- Working with Key Ranges
- Setting Root Notes and Tuning
- Using Automap
- Layered, crossfaded and velocity switched sounds
- Using Alternate
- Sample parameters
- Group parameters
- Synth parameters
- Connections
- NN-19 Sampler
- Introduction
- General sampling principles
- About audio file formats
- About Key Zones and samples
- Loading a Sample into an empty NN-19
- Loading SoundFont samples
- Loading REX slices as samples
- Creating Key Zones
- Selecting Key Zones
- Setting the Key Zone Range
- Deleting a Key Zone
- About Key zones, assigned and unassigned samples
- Adding sample(s) to a Key Map
- Setting the Root Key
- Removing sample(s) from a Key Map
- Removing all unassigned samples
- Rearranging samples in a Key Map
- Setting Sample Level
- Tuning samples
- Looping Samples
- About the Solo Sample function
- Automap Samples
- NN-19 synth parameters
- Play Parameters
- Connections
- Quartet Chorus Ensemble
- Sweeper Modulation Effect
- Alligator Triple Filtered Gate
- Pulveriser
- The Echo
- Scream 4 Sound Destruction Unit
- BV512 Vocoder
- Introduction
- Setting up for vocoding
- Using the BV512 as an equalizer
- BV512 parameters
- Connections
- Tips and tricks
- RV7000 Mk II Advanced Reverb
- Neptune Pitch Adjuster and Voice Synth
- Introduction
- Overview and basic concepts
- Setting up for pitch processing
- Using pitch correction
- Using pitch shifting (Transpose)
- Using Formant control
- Using the Voice Synth
- Panel parameters
- Connections
- Softube Amps
- Audiomatic Retro Transformer
- Channel Dynamics Compressor & Gate
- Channel EQ Equalizer
- Master Bus Compressor
- Synchronous Timed Effect Modulator
- The MClass Effects
- Half-Rack Effects
- The Combinator
- Pulsar Dual LFO
- RPG-8 Arpeggiator
- Matrix Pattern Sequencer
- Mixer 14:2
- The Line Mixer 6:2
- Working with Players
- Settings
- The Reason Rack Plugin Settings dialog
- Index

SUBTRACTOR SYNTHESIZER279
Setting Oscillator 1 Frequency - Octave/Semitone/Cent
By clicking the corresponding up/down buttons you can tune, i.e. change the frequency of Oscillator 1 in three ways:
D In Octave steps
The range is 0 - 9. The default setting is 4 (where “A” above middle “C” on your keyboard generates 440 Hz).
D In Semitone steps
Allows you to raise the frequency in 12 semitone steps (1 octave).
D In Cent steps (100th of a semitone)
The range is -50 to 50 (down or up half a semitone).
Oscillator Keyboard Tracking
Oscillator 1 has a button named “Kbd. Track”. If this is switched off, the oscillator pitch will remain constant, regard-
less of any incoming note pitch messages, although the oscillator still reacts to note on/off messages. This can be
useful for certain applications:
D When Frequency Modulation (FM - see “Frequency Modulation (FM)”) or Ring Modulation (see “Ring Modula-
tion”) is used.
This produces enharmonic sounds with very varying timbre across the keyboard.
D For special effects and non-pitched sounds (like drums or percussion) that should sound the same across the
keyboard.
Using Oscillator 2
You activate Osc 2 by clicking the button next to the text “Osc 2“. Setting oscillator frequency and keyboard tracking
is identical to Oscillator 1.
28 Similar to 27, but with a slightly different character.
29 This waveform has complex, enharmonic overtones, suitable for metallic bell-type sounds.
30 Similar to 29, but with a slightly different character. By using FM and setting the Osc Mix to Osc 1, this and
the following two waveforms can produce noise.
31 Similar to 30, but with a slightly different character.
32 Similar to 30, but with a slightly different character.
|
Waveform
|
Description