
11.3
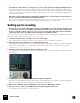
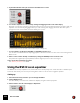
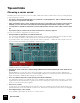
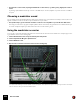
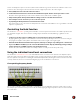
Table Of Contents
- Table of Contents
- Introduction
- Overview
- Audio and MIDI Basics
- Using Reason Rack Plugin as an Instrument
- Using Reason Rack Plugin as an Effect
- Working in the Rack
- Routing Audio and CV
- Sounds, Patches and the Browser
- The I/O device
- Kong Drum Designer
- Introduction
- Overview
- About file formats
- Using patches
- Pad Settings
- The Drum and FX section
- The Drum modules
- The Support Generator modules
- The FX modules
- Connections
- Using Kong as an effect device
- Using external effects with Kong
- Redrum Drum Computer
- Introduction
- About file formats
- Using patches
- Programming patterns
- Redrum parameters
- Using Redrum as a sound module
- Connections
- Dr. Octo Rex Loop Player
- Introduction
- About REX file formats
- Loading and saving Dr. Octo Rex patches
- Playing Loops
- Adding Loops
- Playing individual Loop Slices
- Slice handling
- Dr. Octo Rex panel parameters
- Dr. Octo Rex synth parameters
- Connections
- Europa Shapeshifting Synthesizer
- Introduction
- Panel overview
- Signal flow
- Playing and using Europa
- Panel reference
- Sound Engines On/Off and Edit Focus section
- The Oscillator section
- The Modifiers section
- The Spectral Filter
- The Harmonics section
- The Unison section
- The User Wave and Mixer section
- The Filter section
- The Amplifier section
- The Envelopes section
- Envelope 1, 2, 3 and 4
- Preset
- Adding a Sustain stage
- Adding and removing envelope points
- Changing the envelope curve shape
- Looping the envelope
- Editing levels only
- Creating “free form” envelope curves
- Using the Envelope 3 and Envelope 4 curves as Sound Engine waveforms
- Using the Envelope 4 curve as a Spectral Filter curve
- The LFO section
- The Effects section
- The Modulation Bus section
- Connections
- Tips and Tricks
- Grain Sample Manipulator
- Thor Polysonic Synthesizer
- Subtractor Synthesizer
- Malström Synthesizer
- Monotone Bass Synthesizer
- ID8 Instrument Device
- Rytmik Drum Machine
- Radical Piano
- Klang Tuned Percussion
- Pangea World Instruments
- Humana Vocal Ensemble
- NN-XT Sampler
- Introduction
- Panel overview
- Loading complete Patches and REX files
- Using the main panel
- Overview of the Remote Editor panel
- About Samples and Zones
- Selections and Edit Focus
- Adjusting parameters
- Managing Zones and Samples
- Working with Grouping
- Working with Key Ranges
- Setting Root Notes and Tuning
- Using Automap
- Layered, crossfaded and velocity switched sounds
- Using Alternate
- Sample parameters
- Group parameters
- Synth parameters
- Connections
- NN-19 Sampler
- Introduction
- General sampling principles
- About audio file formats
- About Key Zones and samples
- Loading a Sample into an empty NN-19
- Loading SoundFont samples
- Loading REX slices as samples
- Creating Key Zones
- Selecting Key Zones
- Setting the Key Zone Range
- Deleting a Key Zone
- About Key zones, assigned and unassigned samples
- Adding sample(s) to a Key Map
- Setting the Root Key
- Removing sample(s) from a Key Map
- Removing all unassigned samples
- Rearranging samples in a Key Map
- Setting Sample Level
- Tuning samples
- Looping Samples
- About the Solo Sample function
- Automap Samples
- NN-19 synth parameters
- Play Parameters
- Connections
- MIDI Out Device
- Quartet Chorus Ensemble
- Sweeper Modulation Effect
- Alligator Triple Filtered Gate
- Pulveriser
- The Echo
- Scream 4 Sound Destruction Unit
- BV512 Vocoder
- Introduction
- Setting up for vocoding
- Using the BV512 as an equalizer
- BV512 parameters
- Connections
- Tips and tricks
- RV7000 Mk II Advanced Reverb
- Neptune Pitch Adjuster and Voice Synth
- Introduction
- Overview and basic concepts
- Setting up for pitch processing
- Using pitch correction
- Using pitch shifting (Transpose)
- Using Formant control
- Using the Voice Synth
- Panel parameters
- Connections
- Softube Amps
- Audiomatic Retro Transformer
- Channel Dynamics Compressor & Gate
- Channel EQ Equalizer
- Master Bus Compressor
- Synchronous Timed Effect Modulator
- The MClass Effects
- Half-Rack Effects
- The Combinator
- Pulsar Dual LFO
- RPG-8 Arpeggiator
- Matrix Pattern Sequencer
- Mixer 14:2
- The Line Mixer 6:2
- Working with Players
- Settings
- The Reason Rack Plugin Settings dialog
- Index

BV512 VOCODER573
• The FFT mode is best suited for vocoding speech or vocals, giving crystal clear and highly intelligible results.
It is not so well suited for vocoding drums and percussion, since the FFT process is inherently “slower” than the
regular filtering and doesn’t respond as quickly to transients, and also there will be a slight delay added to the sig-
nal (in the region of 20ms). A workaround solution to this would be to move the modulator signal slightly ahead to
compensate for the delay.
• Where the conventional filter bands are distributed logarithmically (i.e. the same number of filter bands per oc-
tave), the 512 bands in the FFT mode are distributed linearly.
This means a lot of the bands will be in the high frequency range - this is one of the reasons for the clear sound
but it is also something to keep in mind when making settings for the vocoder in FFT mode.
Setting up for vocoding
! Note that the vocoder set-up might differ, depending on which DAW you are using. The important thing in the
vocoder set-up is to be able to route MIDI to an instrument to play the carrier sound - and at the same time also
be able to route the modulator audio (e.g. your voice) to the vocoder. This might require both an instrument
track and an audio track in your DAW. Consult the manual for your DAW for details.
Here are some guidelines for creating a typical vocoder setup. We assume here that you have a MIDI keyboard con-
nected. For details on the parameters, see “BV512 parameters”.
1. Create the instrument device you want to use for the carrier signal.
This could typically be a synth or a sampler. In this example we choose a Subtractor synthesizer.
2. Set up the carrier device (Subtractor) for a sustaining, bright sound.
It’s important to have high frequencies (a lot of harmonics) in the carrier. On the Subtractor, a simple but effective
carrier sound would be based on a sawtooth wave, with the filter fairly open. For more about choosing carrier
sounds, see “Choosing a carrier sound”.
3. Select the carrier device (Subtractor) and create a BV512 Vocoder.
If you flip the rack around you will see that the carrier input of the Vocoder is automatically connected to the Sub-
tractor output:
4. Route the microphone/audio signal to the Modulator Input on the BV512.
Depending on which DAW you are using this routing could be a little different. If possible, connect the appropriate
Audio In on the I/O device to the Modulator input on the back of the BV512.
5. Make sure the “Dry/Wet” knob on the BV512 Vocoder is turned to “Wet” (fully clockwise).
6. Play some notes or chords on your MIDI keyboard and sing through the microphone.
The result should be the classic vocoded vocal sound.