
11.3

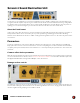
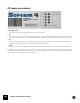
Table Of Contents
- Table of Contents
- Introduction
- Overview
- Audio and MIDI Basics
- Using Reason Rack Plugin as an Instrument
- Using Reason Rack Plugin as an Effect
- Working in the Rack
- Routing Audio and CV
- Sounds, Patches and the Browser
- The I/O device
- Kong Drum Designer
- Introduction
- Overview
- About file formats
- Using patches
- Pad Settings
- The Drum and FX section
- The Drum modules
- The Support Generator modules
- The FX modules
- Connections
- Using Kong as an effect device
- Using external effects with Kong
- Redrum Drum Computer
- Introduction
- About file formats
- Using patches
- Programming patterns
- Redrum parameters
- Using Redrum as a sound module
- Connections
- Dr. Octo Rex Loop Player
- Introduction
- About REX file formats
- Loading and saving Dr. Octo Rex patches
- Playing Loops
- Adding Loops
- Playing individual Loop Slices
- Slice handling
- Dr. Octo Rex panel parameters
- Dr. Octo Rex synth parameters
- Connections
- Europa Shapeshifting Synthesizer
- Introduction
- Panel overview
- Signal flow
- Playing and using Europa
- Panel reference
- Sound Engines On/Off and Edit Focus section
- The Oscillator section
- The Modifiers section
- The Spectral Filter
- The Harmonics section
- The Unison section
- The User Wave and Mixer section
- The Filter section
- The Amplifier section
- The Envelopes section
- Envelope 1, 2, 3 and 4
- Preset
- Adding a Sustain stage
- Adding and removing envelope points
- Changing the envelope curve shape
- Looping the envelope
- Editing levels only
- Creating “free form” envelope curves
- Using the Envelope 3 and Envelope 4 curves as Sound Engine waveforms
- Using the Envelope 4 curve as a Spectral Filter curve
- The LFO section
- The Effects section
- The Modulation Bus section
- Connections
- Tips and Tricks
- Grain Sample Manipulator
- Thor Polysonic Synthesizer
- Subtractor Synthesizer
- Malström Synthesizer
- Monotone Bass Synthesizer
- ID8 Instrument Device
- Rytmik Drum Machine
- Radical Piano
- Klang Tuned Percussion
- Pangea World Instruments
- Humana Vocal Ensemble
- NN-XT Sampler
- Introduction
- Panel overview
- Loading complete Patches and REX files
- Using the main panel
- Overview of the Remote Editor panel
- About Samples and Zones
- Selections and Edit Focus
- Adjusting parameters
- Managing Zones and Samples
- Working with Grouping
- Working with Key Ranges
- Setting Root Notes and Tuning
- Using Automap
- Layered, crossfaded and velocity switched sounds
- Using Alternate
- Sample parameters
- Group parameters
- Synth parameters
- Connections
- NN-19 Sampler
- Introduction
- General sampling principles
- About audio file formats
- About Key Zones and samples
- Loading a Sample into an empty NN-19
- Loading SoundFont samples
- Loading REX slices as samples
- Creating Key Zones
- Selecting Key Zones
- Setting the Key Zone Range
- Deleting a Key Zone
- About Key zones, assigned and unassigned samples
- Adding sample(s) to a Key Map
- Setting the Root Key
- Removing sample(s) from a Key Map
- Removing all unassigned samples
- Rearranging samples in a Key Map
- Setting Sample Level
- Tuning samples
- Looping Samples
- About the Solo Sample function
- Automap Samples
- NN-19 synth parameters
- Play Parameters
- Connections
- MIDI Out Device
- Quartet Chorus Ensemble
- Sweeper Modulation Effect
- Alligator Triple Filtered Gate
- Pulveriser
- The Echo
- Scream 4 Sound Destruction Unit
- BV512 Vocoder
- Introduction
- Setting up for vocoding
- Using the BV512 as an equalizer
- BV512 parameters
- Connections
- Tips and tricks
- RV7000 Mk II Advanced Reverb
- Neptune Pitch Adjuster and Voice Synth
- Introduction
- Overview and basic concepts
- Setting up for pitch processing
- Using pitch correction
- Using pitch shifting (Transpose)
- Using Formant control
- Using the Voice Synth
- Panel parameters
- Connections
- Softube Amps
- Audiomatic Retro Transformer
- Channel Dynamics Compressor & Gate
- Channel EQ Equalizer
- Master Bus Compressor
- Synchronous Timed Effect Modulator
- The MClass Effects
- Half-Rack Effects
- The Combinator
- Pulsar Dual LFO
- RPG-8 Arpeggiator
- Matrix Pattern Sequencer
- Mixer 14:2
- The Line Mixer 6:2
- Working with Players
- Settings
- The Reason Rack Plugin Settings dialog
- Index

SCREAM 4 SOUND DESTRUCTION UNIT567
The Body parameters are as follows:
About the envelope follower
The Body section features an envelope follower for dynamic control of the Scale parameter. The envelope follower
analyzes the amplitude of the incoming signal and changes the Scale setting accordingly - the louder the incoming
signal the higher the value of the Scale parameter. The operating frequency (or size) range is set with the Scale pa-
rameter, and the envelope follower amount is set with the Auto parameter. A typical use for this is auto-wah effects
- try Body Type “B” for a pronounced wah effect.
• On the back of the Scream 4 you will find an Auto CV output - this delivers the CV signal from the envelope fol-
lower, allowing you to dynamically control parameters in other devices. See “Creating a real dynamic wah ef-
fect with the envelope follower” for an example.
About the Master level control
The Master level control should be used when you need to increase or decrease the output level, while retaining the
basic character of the effect. It can also be used to balance the level between the distorted sound and the “clean”
(unprocessed) sound if the effect is to be switched in and out in the mix.
If the output level is too high, turning down the Damage Control setting would lower the output, but it would also
change the character of the distortion, as would changing eq or presence settings.
Simply lowering the mixer channel level (for the channel that Scream 4 is connected to) would also work of course,
but this would also mean that the level difference between the unprocessed and processed sound would increase.
So if the clip indicator lights up on the Transport, or if the distorted sound is too loud compared to the normal sound,
the solution is to lower the Master output level.
As pointed out elsewhere in the manual, audio out clipping (indicated by the red clip indicator lighting up on the
Transport Panel) can only happen in the Reason Hardware Interface. In other words, you never have to worry about
levels passed internally from device to device. However, bear in mind that if you use high Master output settings (or
a lot of boost in the Cut section) Scream 4 can quite easily cause audio out clipping - and that is most likely not a dis-
tortion effect you want!
|
Parameter
|
Description
Body button This switches the Body section on or off.
Body Type knob This is used to select one of the five available Body types (A-E).
Body Reso knob This simulates the resonance of the selected Body. Turning the knob clockwise gives a more
resonant effect.
Body Scale The Body Scale parameter could be said to control the “size” of the Body. Note that this is “in-
verted” - turning the knob clockwise reduces the emulated size.
Auto knob Determines the amount of envelope follower effect on the Scale parameter - see below.