
11.3
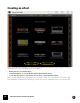
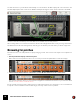
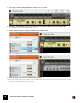
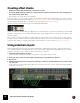
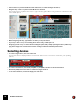
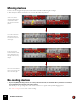
Table Of Contents
- Table of Contents
- Introduction
- Overview
- Audio and MIDI Basics
- Using Reason Rack Plugin as an Instrument
- Using Reason Rack Plugin as an Effect
- Working in the Rack
- Routing Audio and CV
- Sounds, Patches and the Browser
- The I/O device
- Kong Drum Designer
- Introduction
- Overview
- About file formats
- Using patches
- Pad Settings
- The Drum and FX section
- The Drum modules
- The Support Generator modules
- The FX modules
- Connections
- Using Kong as an effect device
- Using external effects with Kong
- Redrum Drum Computer
- Introduction
- About file formats
- Using patches
- Programming patterns
- Redrum parameters
- Using Redrum as a sound module
- Connections
- Dr. Octo Rex Loop Player
- Introduction
- About REX file formats
- Loading and saving Dr. Octo Rex patches
- Playing Loops
- Adding Loops
- Playing individual Loop Slices
- Slice handling
- Dr. Octo Rex panel parameters
- Dr. Octo Rex synth parameters
- Connections
- Europa Shapeshifting Synthesizer
- Introduction
- Panel overview
- Signal flow
- Playing and using Europa
- Panel reference
- Sound Engines On/Off and Edit Focus section
- The Oscillator section
- The Modifiers section
- The Spectral Filter
- The Harmonics section
- The Unison section
- The User Wave and Mixer section
- The Filter section
- The Amplifier section
- The Envelopes section
- Envelope 1, 2, 3 and 4
- Preset
- Adding a Sustain stage
- Adding and removing envelope points
- Changing the envelope curve shape
- Looping the envelope
- Editing levels only
- Creating “free form” envelope curves
- Using the Envelope 3 and Envelope 4 curves as Sound Engine waveforms
- Using the Envelope 4 curve as a Spectral Filter curve
- The LFO section
- The Effects section
- The Modulation Bus section
- Connections
- Tips and Tricks
- Grain Sample Manipulator
- Thor Polysonic Synthesizer
- Subtractor Synthesizer
- Malström Synthesizer
- Monotone Bass Synthesizer
- ID8 Instrument Device
- Rytmik Drum Machine
- Radical Piano
- Klang Tuned Percussion
- Pangea World Instruments
- Humana Vocal Ensemble
- NN-XT Sampler
- Introduction
- Panel overview
- Loading complete Patches and REX files
- Using the main panel
- Overview of the Remote Editor panel
- About Samples and Zones
- Selections and Edit Focus
- Adjusting parameters
- Managing Zones and Samples
- Working with Grouping
- Working with Key Ranges
- Setting Root Notes and Tuning
- Using Automap
- Layered, crossfaded and velocity switched sounds
- Using Alternate
- Sample parameters
- Group parameters
- Synth parameters
- Connections
- NN-19 Sampler
- Introduction
- General sampling principles
- About audio file formats
- About Key Zones and samples
- Loading a Sample into an empty NN-19
- Loading SoundFont samples
- Loading REX slices as samples
- Creating Key Zones
- Selecting Key Zones
- Setting the Key Zone Range
- Deleting a Key Zone
- About Key zones, assigned and unassigned samples
- Adding sample(s) to a Key Map
- Setting the Root Key
- Removing sample(s) from a Key Map
- Removing all unassigned samples
- Rearranging samples in a Key Map
- Setting Sample Level
- Tuning samples
- Looping Samples
- About the Solo Sample function
- Automap Samples
- NN-19 synth parameters
- Play Parameters
- Connections
- MIDI Out Device
- Quartet Chorus Ensemble
- Sweeper Modulation Effect
- Alligator Triple Filtered Gate
- Pulveriser
- The Echo
- Scream 4 Sound Destruction Unit
- BV512 Vocoder
- Introduction
- Setting up for vocoding
- Using the BV512 as an equalizer
- BV512 parameters
- Connections
- Tips and tricks
- RV7000 Mk II Advanced Reverb
- Neptune Pitch Adjuster and Voice Synth
- Introduction
- Overview and basic concepts
- Setting up for pitch processing
- Using pitch correction
- Using pitch shifting (Transpose)
- Using Formant control
- Using the Voice Synth
- Panel parameters
- Connections
- Softube Amps
- Audiomatic Retro Transformer
- Channel Dynamics Compressor & Gate
- Channel EQ Equalizer
- Master Bus Compressor
- Synchronous Timed Effect Modulator
- The MClass Effects
- Half-Rack Effects
- The Combinator
- Pulsar Dual LFO
- RPG-8 Arpeggiator
- Matrix Pattern Sequencer
- Mixer 14:2
- The Line Mixer 6:2
- Working with Players
- Settings
- The Reason Rack Plugin Settings dialog
- Index

USING REASON RACK PLUGIN AS AN EFFECT55
Creating effect chains
• Adding more effects will automatically connect them in series.
• If you press [Shift] and drag an effect up or down in the rack, it will be automatically re-routed, changing the or-
der of effects in the signal chain.
Note that this can change the sound drastically!
It is also possible to do more complex setups such as splits and parallel effect chains. For this you could use devices
such as the Spider Audio Merger & Splitter (see “Spider Audio Merger & Splitter”). This would require you to do some
manual routing by dragging cables on the back of the rack. Read more in “Manual routing”.
All effect devices in Reason Rack Plugin have a Bypass/On/Off switch:
This is normally set to On, but setting it to Bypass lets you temporarily disconnect the effect. Setting an effect to Off
will silence it completely (no sound will be passed through). This is mainly useful if you are using send effects or par-
allel effect chains.
Once you have an effect chain that you're happy with, you could Combine it (by selecting all devices and selecting
Combine from the context menu). This creates a Combinator with all devices. You can save this as a combi patch and
load it into other instances of Reason Rack Plugin or the standalone version of Reason, see “The Combinator”.
Using sidechain inputs
Reason Rack Plugin has four audio input channels: Main left + right and Sidechain left + right. This allows you to
send an additional stereo audio signal into the rack (provided that your DAW host supports this). How you use this is
really up to you, but a common usage would be sidechaining a compressor:
1. Open Reason Rack Plugin as an effect.
For this example, you should add it as an insert effect on a synth pad track or similar.
2. In the rack, add a compressor device with a sidechain input, e.g. the M-Class Compressor.
3. Flip the rack.
4. Click the Sidechain input on the Compressor and drag to connect it to the Sidechain In on the I/O device at the
top of the rack.
(If the I/O device is folded, just hold the cable over the folded device for a moment - it will unfold automatically to
allow you to connect it.)
Connecting the Sidechain inputs of the MClass Compressor.