
11.3
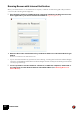
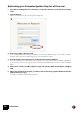
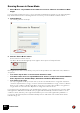
Table Of Contents
- Table of Contents
- Introduction
- Installation
- Requirements
- About the Audio Hardware
- About MIDI Interfaces
- Installing the Software
- Installing Reason
- The Authorization system
- Registering Reason
- Running Reason with Internet Verification
- Authorizing your Computer/Ignition Key (for off-line use)
- About deauthorizing the computer/Ignition Key
- Running Reason on an authorized computer - or with an authorized Ignition Key
- Running Reason in Demo Mode
- Setting Up

INSTALLATION
15
• If you are not using a USB keyboard, you may also connect the MIDI Out from the MIDI in-
terface to the MIDI In on your MIDI keyboard.
This is not strictly necessary to use Reason, but it will enable two-way communication when you run
the Reason Setup Wizard which appears the first time Reason is launched (see “First run - Reason
Setup Wizard”), or when using Auto-detect Surfaces in the Preferences (see “Adding a specific Con-
trol surface”). Whether auto-detection works or not depends on the keyboard model.
! If you have several MIDI control surfaces or similar that you want to use, we recommend
that you connect them to separate MIDI ports (or directly to the computer using USB).
MIDI Out Connections
If you have external synthesizers, drum machines or other devices that can be played via MIDI, you can
control them from Reason. For this you need to have a MIDI interface with one or several outputs.
D Connect a MIDI cable from a MIDi Out jack on the MIDI interface to the MIDI In jack on
your external instrument.
Read more about how to control external MIDI devices from Reason in the Reason Operation
Manual.pdf or Reason Help in the program.
Installing the Software
! Both the stand-alone version of Reason and the Rack Plugin are installed in the same
procedure. So, even if you are only planning to use the Rack Plugin version of Reason,
follow the installation procedure(s) below:
Installing Reason
D Unzip the download file (Windows) or mount the disk image file (macOS).
What to do next depends on whether you are installing on a Mac or a Windows computer.
Windows:
1. Locate the file called “Install Reason 11.exe" and double click it.
2. Follow the instructions on screen.
Before executing the installation of the software components, you will be asked to select a language,
an install location, and whether you wish to create a program shortcut/alias on your desktop. When the
installation is complete, you have the option of launching Reason directly.
The Reason Rack Plugin VST3 is automatically installed in C:\Program Files\Common Files\VST3.
macOS:
1. Double click the Reason installation file.
2. Follow the instructions on screen.
The Reason Rack Plugin VST3 is automatically installed in
Macintosh HD/Library/Audio/Plug-Ins/VST3.
The Reason Rack Plugin AUv2 is automatically installed in
Macintosh HD/Library/Audio/Plug-Ins/Components.