
10.4
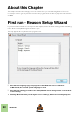


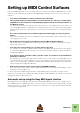
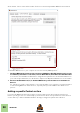
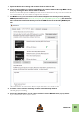
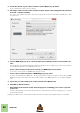
Table Of Contents
- Table of Contents
- Introduction
- Installation
- Requirements
- About the Audio Hardware
- About MIDI Interfaces
- Installing the Software
- Installing Reason from DVD or download
- The Authorization system
- Registering Reason
- Running Reason with Internet Verification
- Authorizing your Computer/Ignition Key (for off-line use)
- About deauthorizing the computer/Ignition Key
- Running Reason on an authorized computer - or with an authorized Ignition Key hardware
- Running Reason in Demo Mode
- Setting Up

SETTING UP
30
5. Select the model of your control surface from the Model pop-up menu.
If you can't find it on the menu, see below.
6. An image of the selected control surface model is shown, often along with some informa-
tion text - read this carefully.
For some control surfaces, you need to select a specific preset to use the surface with Reason - this
is noted here.
7. Use the MIDI Input pop-up to select the input port to which you have connected the sur-
face.
If in doubt, you can click the Find button and then tweak a control or play a key on the control surface
to have Reason find the correct input port for you.
• Some control surfaces may have more than one MIDI Input pop-up menu.
You need to select ports on all MIDI Input pop-up menus.
• Some control surfaces will have a MIDI Output pop-up menu.
In some cases this labeled "Optional" - then you don't have to make a selection. In other cases, a MIDI
Output is required. This is the case if the control surface uses MIDI feedback - motor fader, displays,
etc.
8. If you like, you can rename your control surface in the Name field.
9. Click OK to add the surface.
• Depending on the surface model, alerts may appear, reminding you to select a specific
preset etc.
In some cases, Reason can restore a preset in the control surface to factory settings for you - you are
then informed of this.
Finally you return to the Control Surfaces tab in Preferences, where your added surface is now listed.