
Owners manual


4 | P a g e
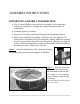
ASSEMBLY INSTRUCTIONS
IMPORTANT ASSEMBLY INFORMATION
You will need a Phillips Screwdriver (not included), and an adjustable
wrench (not included) to assemble this trampoline and enclosure net
combination.
Assembly requires two adults.
Wear gloves to protect your hands from pinch points during assembly.
When your trampoline was shipped, a thin film of oil was applied to all
metal parts to extend the life of your trampoline. During clubhouse assembly
be sure to wear clothing that will not be damaged or stained by any slight oil
residue. When the trampoline is completely reassembled with the clubhouse,
all metal parts with oil film will be covered.
Step 1 – Unsecure the Enclosure Poles from the Frame by
un-attaching the bolts and nuts through the T-Brackets.
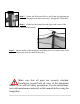
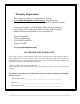
Step 2 – Lift the enclosure
poles out of the t-bracket slots
and lean them forward so they
are resting on the jumping
mat (as shown in the picture
to the left).
Note: Remember where the enclosure
entrance is located