–––– Shade Cover User Manual For Round Propel Trampoline Models Assembly, Installation, Care, Maintenance, and User Instructions WARNING READ THESE MATERIALS PRIOR TO ASSEMBLING AND USING THIS TRAMPOLINE SHADE COVER Failure to assemble and use this Trampoline Shade Cover as specified in this manual will automatically void the warranty.
Do Not return this product to the store. Instead, please visit our website at www.PropelTrampolines.com where you will find our current contact information. Our friendly customer service staff can help you with any problems or questions that may arise during the installation, use, maintenance of your Trampoline Shade Cover. WARNING Read all assembly, care, maintenance, and user instructions in this manual prior to installing and using this Trampoline Shade Cover.
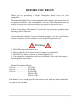
BEFORE YOU BEGIN Thank you for purchasing a Propel Trampoline Shade Cover for your trampoline. This trampoline Shade Cover comes equipped with warnings and instructions for its proper installation, care, maintenance, and use. This information must be read by all supervisors and users before any person is allowed to use it. Follow all warnings in this manual. If you have any questions regarding these warnings, please contact us.
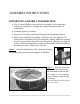
ASSEMBLY INSTRUCTIONS IMPORTANT ASSEMBLY INFORMATION You will need a Phillips Screwdriver (not included), and an adjustable wrench (not included) to assemble this trampoline and enclosure net combination. Assembly requires two adults. Wear gloves to protect your hands from pinch points during assembly. When your trampoline was shipped, a thin film of oil was applied to all metal parts to extend the life of your trampoline.
Step 3 – Unfold the Shade Cover. Pull the Shade Cover over the entire enclosure, poles, and trampoline. Step 4 – Lift each Enclosure Pole and Shade Cover upright. (Make sure the Curved Section of the enclosure pole is facing outward). Insert the bottom end of the Post into its corresponding T-Bracket Slot. This will allow the Enclosure and Shade Cover to be completely erected from ground level.
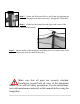
Step 5 – Secure the Enclosure Poles to the Frame by attaching the bolts and nuts that were removed in step 1 through the T-Brackets. Step 6 – Climb into the trampoline and align each corner of the Shade Cover to each enclosure pole. Step 7 – On the outside of the trampoline and Shade Cover, tie each corner to the upper enclosure pole (near the bend in the pole). Make sure that all parts are securely attached. Familiarize yourself and all users of the trampoline Shade Cover with all safety precautions.
LIMITED WARRANTY PROPEL warrants its trampoline products to be free from defects in material and workmanship under normal use and service conditions. The Propel Trampoline Shade Cover accessory is warranted for ninety (90) days from the date of purchase. All warranty coverage extends only to the original retail purchaser from the original date of purchase. Our obligation under this warranty is limited to replacing or repairing the product at our discretion.
Warranty Registration Don’t forget to register your trampoline by visiting www.PropelTrampolines.com/warranty . Registering your Trampoline Shade Cover entitles you to receive all warranty benefits. You may also register your Trampoline Shade Cover by mailing a copy of your sales receipt along with your name, address, phone number and the model number of your trampoline to: Propel Trampolines Warranty Department 41 East 400 North #324 Logan, UT 84321 www.propeltrampolines.