Intel ®Modular Server to VTrak E-Class CONNECTION GUIDE Version 0.81 © 2008 Promise Technology, Inc. All Rights Reserved.
Intel® Modular Server Connection Guide Modular Server-to-VTrak Connection This document contains the following topics and tasks: • Logical Drive and LUN Numbering Strategy (page 3) • Prerequisites (page 3) • Task 1: Log into Modular Server Control (page 4) • Task 2: Enabling External Ports (page 6) • Task 3: Attaching the SAS Cable (page 8) • Task 4: Finding the VTrak’s IP Address (page 9) • Task 5: Logging into WebPAM PROe (page 11) • Task 6: Creating Logical Drives (page 13) • Task 7: As
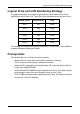
Logical Drive and LUN Numbering Strategy Logical Drive and LUN Numbering Strategy A suggested strategy is to create a logical drive for each blade server. Each logical drive has its own LUN. The LUN is 0 so the blade server can boot from it. Blade Server Logical Drive LUN Slot 1 LD1 LUN0 Slot 2 LD2 LUN0 Slot 3 LD3 LUN0 Slot 4 LD4 LUN0 Slot 5 LD5 LUN0 Slot 6 LD6 LUN0 This strategy is followed throughout this document.
Intel® Modular Server Connection Guide Task 1: Log into Modular Server Control 1. On your PC workstation, open Internet Explorer. 2. In the Address field, type https:// followed by the IP address of your Modular Server, then press Enter. The Modular Server Control (MSC) log-in screen appears. 3. In the MSC log-in screen: • Type admin in the Username field. • Type admin in the Password field. • Click the Log In button. The Username and Password are case sensitive. Figure 1.
Task 1: Log into Modular Server Control Figure 2.
Intel® Modular Server Connection Guide Task 2: Enabling External Ports The Modular Server has external ports that each blade server can access. The port numbers correspond to the slot number of each blade server. To enable a port is to enable the external data connection, in this case, to access a LUN on the VTrak. To enable the external ports: 1. In the MSC screen, click the Chassis Back tab. 2. Click the SCM 1 component in the enclosure graphic. 3. Click Expansion Port in the SCM 1 Actions menu.
Task 2: Enabling External Ports Figure 4. MSC Expansion Port dialog box Server 1’s external port is now enabled. It will appear as a SAS initiator in WebPAM PROe. In “Task 7: Associating LUNs and Initiators” on page 16, you will associate this port or initiator with a LUN. What to do next • If you are working through the Connection Guide for the first time, continue with “Task 3: Attaching the SAS Cable” on page 8.
Intel® Modular Server Connection Guide Task 3: Attaching the SAS Cable 1. Power off the VTrak. 2. Insert the SAS cable connector into the SAS port on Storage Controller 1. 3. Insert the other end of the SAS cable into one of the SAS data ports (diamond icon) on the VTrak. If you plan to attach a SAS cable to Storage Controller 2, be sure you connected the other end of the cable to one of the SAS data ports (diamond icon) on the other VTrak controller. See Figure 5. Figure 5.
Task 4: Finding the VTrak’s IP Address Task 4: Finding the VTrak’s IP Address You must first set up a serial connection between the VTrak and your PC. Then you can run Microsoft HyperTerminal to access the VTrak’s command line interface (CLI) to find the IP address.
Intel® Modular Server Connection Guide 3. Press Enter once to launch the CLI. 4. At the Login prompt, type administrator and press Enter. 5. At the Password prompt, type password and press Enter. At this point, you are in the CLI. 6. To view the IP address, type net and press Enter. administrator@cli> net =========================================== CId Port Type IP Mask Gateway Link =========================================== 1 1 Mgmt 192.168.10.85 255.255.255.0 192.168.10.
Task 5: Logging into WebPAM PROe Task 5: Logging into WebPAM PROe To log into WebPAM PROe: 1. Launch your Browser. 2. In the Browser address field, type in the virtual IP address of the VTrak. Use the virtual IP address you obtained in Step 4 (see page 9). Note that the IP address shown below is only an example. The IP address you type into your browser will be different. Regular Connection • WebPAM PROe uses an HTTP connection. . . . . . . . . . . . . . . .http:// • Enter the VTrak’s IP address . .
Intel® Modular Server Connection Guide Figure 7. WebPAM PROe log-in screen After sign-in, the WebPAM PROe opening screen appears. You are ready to create your disk arrays and logical drives.
Task 6: Creating Logical Drives Task 6: Creating Logical Drives WebPAM PROe offers three methods of creating disk arrays and logical drives. Two of these methods are suitable for Modular Server because they can create multiple logical drives: • Express – You choose the RAID characteristics and type of application. Creates a disk array and logical drives based on your input. Faster. • Advanced – You specify all parameters for the disk array and logical drives.
Intel® Modular Server Connection Guide The following parameters display: • Disk Arrays – The number of physical drives in the disk array, their slot numbers, configurable capacity, and the number of logical drives to be created • Logical Drives – The slot number of the logical drive(s), their RAID level, capacity, and stripe size For Modular Server, create six logical drives.
Task 6: Creating Logical Drives there is free capacity remaining, you can specify another logical drive now or wait until later. For Modular Server, create six logical drives. Name them LD1 through LD6. 9. Enter an alias for the logical drive in the field provided. 10. Choose a RAID level for the logical drive from the dropdown menu. The choice of RAID levels depends the number of physical drives you selected. 11. RAID 50 and 60 only – Specify the number of axles for your array.
Intel® Modular Server Connection Guide Task 7: Associating LUNs and Initiators A LUN represents a logical drive on the VTrak. An initiator represents a blade server in the Modular Server. Each blade server uses LUN0 for booting and storage.
Task 7: Associating LUNs and Initiators What to do next • If you do not have a LUN Map, continue with “Adding a LUN Map” below. • If you have a LUN Map, continue with “Editing a LUN Map” below. Adding a LUN Map A LUN map associates LUNs and initiators. To add the LUN Map: 1. Click the Subsystem icon in Tree View. 2. Click the Administrative Tools 3. Click the Storage Services 4. Click the LUN Map tab in Management View and from the dropdown menu, choose Add a LUN Map. 5.
Intel® Modular Server Connection Guide This action completes the association of the blade servers in slots 2 through 6 with logical drives LD2 through LD6, respectively. What to do next • Go back to “Task 2: Enabling External Ports” on page 6 and enable one more External Port until all the ports have been enabled.
Task 8: Installing an OS on a Blade Server Task 8: Installing an OS on a Blade Server In this case, the phrase installing an OS on a blade server refers to installing the OS onto the VTrak LUN assigned to the blade server. Connections required to boot the blade server and install the OS are made through the 15-pin video connector and two USB connectors on the front panel. This procedure requires a monitor, keyboard, mouse, and an external CD drive with a USB 2.0 interface.
Intel® Modular Server Connection Guide 20